![]()
Walker on Stunt
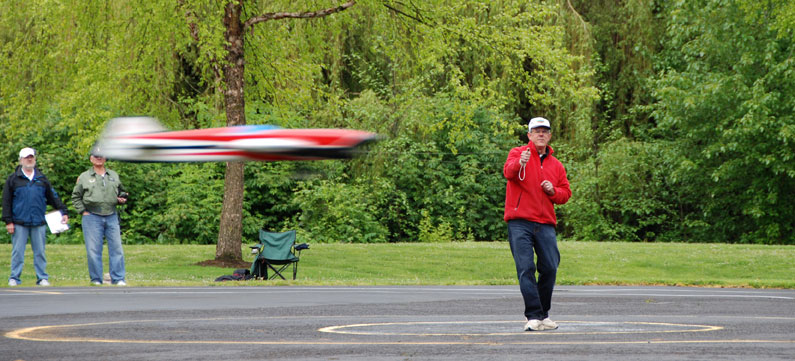
Paul Walker's Predator flies straight and true at the 2014 Jim Walker Memorial Spring Tune-Up. Paul is a master of trimming airplanes, and his stunt trim flow chart, first published in the Flying Lines newsletter in January 1981 and later revised and updated, has become the bible of trimming for the stunt world. Flying Lines photo.
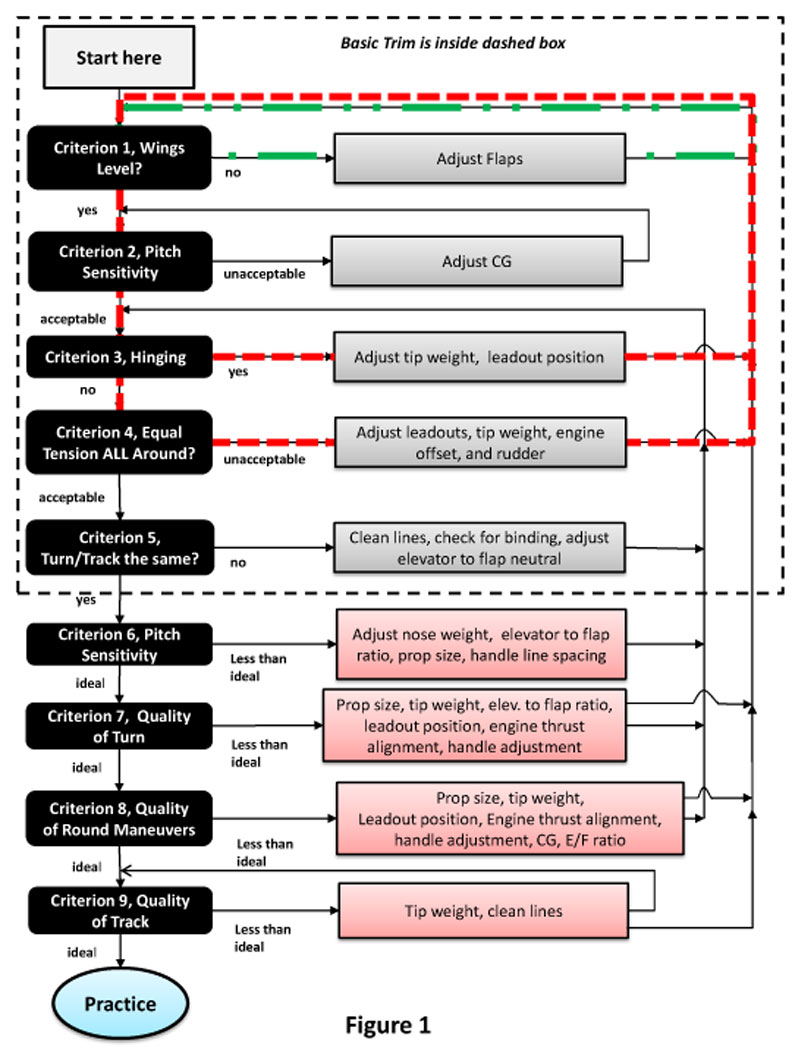
The trim flow chart, Chapter 1: Basic trim
By Paul Walker
March 2015
(EDITOR'S NOTE: This is the first installment of Paul's most recent trim flow chart update and series of articles. These articles were first published in Stunt News, the magazine of the Precision Aerobatics Model Pilots Association, and are reprinted here by permission of SN editor Bob Hunt.)
Welcome to this new column that Bob Hunt conceived. After some thought, I agreed to the large salary and signing bonus. I asked Bob for a list of topics that he thought should be discussed. I will do my best to discuss those subjects, and others that I have as well. The first subject to be discussed is one that I get questions about all the time. That being the flow chart I developed years ago for trimming a stunt plane that was printed in Flying Models. After years of flying, trimming and competing I find that it could use some updating. This is the chart accompanying this issue. Burn it or copy it, it's yours! This topic will be covered in at least three different sections. The first two discuss the process to work through the flow chart and the third (and on) will be some more subtle issues associated with trimming.
There are a few terms that need to be defined prior to starting. In the context of this discussion roll, pitch and yaw are defined with respect to a reference system that is fixed to the plane, regardless of any orientation the plane is in with respect to the ground. Further, it is assumed that you will be starting with a STRAIGHT plane at a REASONABLE weight. Since this is such an important issue, I will discuss in a future article what my processes are to get my planes as straight as I can, and how to bench trim them. Starting with a warped plane will lead to a lot of frustration!
The flow chart is a systematic way to trim your plane when followed. It is broken into two sections: Basic trim and advanced trim. Basic trim is really required to have a plane that is predictable and repeatable. It also prepares the plane for more “advanced” trimming by having it in a condition so that the future effects can be felt and worked on. This level should be attainable by anyone using this chart. This is the area covered by this first section. The “advanced” trim issue will follow in the next issue. As stated previously, it is assumed that your plane is straight, as this trim process will not produce a winner if the plane is warped to start with. However, sometimes this process will point out that the plane IS warped as it will be impossible to satisfy a criterion to move on. That issue will be discussed on the third installment of this series. The process involves working to satisfy, in a positive way, the criterion at each loop (dark boxes on the chart). An example of a loop is the first criterion, “wings level”. The question, “Are the wings level” is addressed. If not level, they will be adjusted, and then following the arrows on the flowchart, return to the “wings level” box. This forms one loop. A loop will be cycled through until the criterion is met.
I most often fly by myself, and have developed a reasonable eye at seeing these criteria. If you can see the roll, pitch and yaw as the plane flies through every maneuver, you are ready to start. However, many times it is easier with a helper who can more easily see from the outside what you are looking for. Never turn down quality help! Going through this process looking for one item at a time will help you develop an eye for seeing these deviations.
 Criterion one is to level the wings. Sounds easy, but many times this level of trim can be a bit tricky early on. The obvious result of this step is having the wings parallel to the ground both upright and inverted when at five foot level flight. Since this is the first step in the trim process, there can easily be too much wing tip weight which will roll the wing out (away from the pilot) in both directions. The outboard tip will be down relative to the inboard tip both ways. If the upright level and inverted level are not the same “tweak” the flaps, re-fly and recheck. Continue this process until the wings sit the same relative to horizontal both upright and inverted. This result is somewhat different than the ideal outcome, but at this stage this is the best it can get with the existing configuration of the plane. This is one of my most distasteful phases of trimming as I hate tweaking the flap horn as it is never easy to get that needed small change. I have seen this process take all day to get just right. Twist once, nothing, twist twice, again nothing, twist a third time and presto get way too much. Then it is the same process going the other way. This can be frustrating, and can result in a “good enough” situation where it is really not “good enough”. Because of this I developed a system that is adjustable by a ball driver form the outside of the plane. In three flights I can usually get the wings very level. The system adds about a half-ounce to the plane, but is invaluable for those sometimes needed adjustments at critical times. I will cover this in a future article.
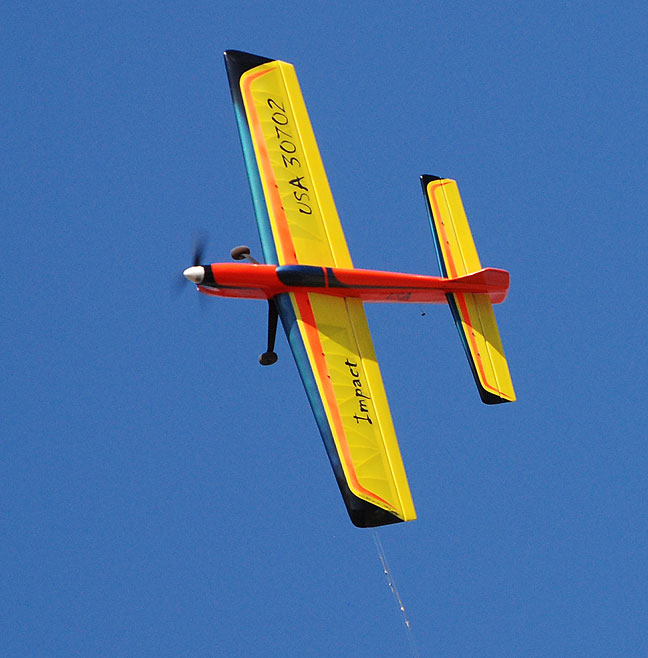
Photo: Paul's electric Impact performs an overhead eight at the 2012 Fall Follies in Salem, Ore. Flying Lines photo.
My tip here for doing this yourself is “simple”. When flying level at five feet, hold your flying hand up to eye level just to the side of your eye. This way you can look directly down the lines, and since the lines are parallel to the ground at this point, so should the wing. Sighting down the lines helps in seeing the orientation of the wings easier and more accurately. A little practice at this and it will be easy to do upright and inverted.
Criterion two is to adjust the pitch sensitivity. An astute observer would note that if on the first flight it was discovered that the CG was way too aft that this would be adjusted before the wing level situation. I believe that in most cases, the first flights will be in a more nose heavy situation to be on the cautious side. By all means, if it IS too tail heavy, add nose weight before leveling the wings. Once the wings are level, get a feel of how sensitive the plane feels. Adjust the CG forward or aft based on the pitch response. The goal here is not to make it perfect, but to make it friendly enough to progress to further stages of trimming. There are numerous adjustments that affect pitch sensitivity, and they are covered in the advanced “phase” of this chart. The goal here is to make it manageable so that other critical adjustments can be made before making the final pitch adjustments. A quick check is to notice what the plane does in pitch just after the engine shuts off. If it pitches up, it is too tail heavy. If the nose drops it is too nose heavy.
Criterion three adjusts the wing tip weight. The process I use is to enter a wingover, climb over the top and at about forty five degrees on the down side perform a tight corner. Watch carefully what the wing does relative to the lines. Similar to looking down the lines like criterion 1, get into a habit of sighting down the lines and watching what the wings do in roll relative to the lines. The lateral axis of the wing (tip to tip line) should remain in-line with a line from the hand to the wing tip (sort of like the lines) at all times. This is part of the reason I hold my hand up so high. It forms an easy line of sight to check this. With the lines up at eye level, it becomes easier (more sensitive) to see the outboard tip rolling in or out (seeing the bottom of the outboard wing, or seeing the top of the outboard wing). If it rolls away from you, reduce the amount of tip weight, and re-try this test. The amount of weight depends on how much the plane weighs and how much it rolls out. Quick side note here: This is the MOST common error I find when flying other pilots planes. Most everybody carries TOO much tip weight. I have flown other Top Five pilot's planes just after the final five at the Nat's and they too had too much tip weight. It is like “comfort food”. It feels good, but is really not good for your scores! On the flip side, if the plane rolls in towards you in that test corner add tip weight and re-fly. Continue this process until the plane does this maneuver without detectable roll. Please understand that you do not want to do a full throw corner when doing this test. Even a fully trimmed Nat's winning plane will have difficulty doing a full throw corner without a bit of roll. Note that after adjusting the tip weight or leadout position, cycle back to step one and re-check the wings for level again. Sometimes when the tip was low both ways in step one, removing tip weight in step three will rectify that situation. Sometimes excess tip weight will “hide” the true wing level when just starting, and if the wings are not level when returning from step three, re-level the wings and proceed back to step three.
There is another issue in the trim that may be contributing to roll in corners. If the leadouts are way out of adjustment, they may induce a yaw which will affect the roll situation. If they are too far forward, they will create a nose in yaw which will tend to lift the tip (roll in) both inside and outside. If they are too far aft, the opposite situation exists. This yawing condition is more difficult to see, as sometimes I have to ask myself which came first, the yaw or the roll (chicken or the egg!). For the purpose of this discussion, it is assumed that the plane has been bench trimmed prior to flight and they are not in an extreme location.
Criterion four is the adjustment for “equal” line tension through “all” maneuvers. No, this is not possible in the strictest sense, but the concept of having acceptable tension everywhere IS the idea. There are numerous factors that can influence a shortfall. Listed are: Leadouts, tip weight, engine offset, and rudder offset in the order of significance. Also note on the chart that this is another set of adjustments that can start affecting changes previously made. Once a change is made, it must be evaluated for the primary affect but also the previous settings as indicated on the chart. In this case, if an adjustment is made here, re-check the hinging loop.
In general, if your leadouts are too far forward it will set up a yaw in maneuvers that can reduce line tension. Keep a watch for yaw as well as roll. It can be seen in the landing gear legs, having one move relative to the other. The inboard wingtip can also be seen moving fore and aft as well. If you see the plane yawing in, move the leadouts aft, and follow the arrows of the chart. In this case, re-verify that the plane is not hinging. If it is not hinging as a result, check the line tension to see if it is more uniform. Most every trim change made here affects other aspects of flight, and these must be checked. In moving the leadouts back, there will be less of a need for tip weight. Moving the leadouts back will generally increase the hinging! Also watch closely the hourglass. Lots of bad things happen here when out of trim. If the plane turns the first corner fine, climbs toward the second corner and loses line tension before the corner, turns through the corner yaws in on the second and third corner then completes the fourth corner acceptably, even though the line tension is too low it is likely the leadouts are too far forward. Moving them aft will help both the vertical climb and the yaw on corners two and three. Be sure to follow the process of the chart. If tip weight were added first, it will mask the leadout situation and it “might” feel like all is well as the problem in the hourglass at the top “may” feel like it is resolved.
Leadouts that are too far aft will cause the line tension to increase on the bottom of round loops and decrease on the top. If this is felt, move them forward and re-test. Leadouts aft will generally improve the overhead maneuvers (which I like). However, if too far aft many of the maneuvers will be soft. Move them forward to get the best balance of overhead drive and below 45 degree tension.
When satisfied with leadout position is in the best position at this level of trim, consider changing tip weight to help generate consistent line tension. If the plane does not yaw in the top two corners of the hourglass, but the tension is still a bit light, try adding tip weight and re-evaluating this maneuver. Yes, this sends you back to step one once again!
If leadout and tip weight adjustments haven't balanced the line tension adequately, consider adding a touch of engine offset. This will give it a touch of outboard yaw helping in lower tension areas. Again this can affect other trim adjustments.
Finally, in the same vein as engine offset, try a touch of rudder offset. I have done this in the past, and in all cases as the trim improved towards the end of this process, the rudder offset came out to “clean up” square corners. At this point, a “Rabe” rudder could be considered. However, I have found it better to wait until later in the trim process to add this feature.
At this point, we should have a plane that is flying “level” both ways, is controllable, doesn't hinge or has minor hinging, and has “balanced tension throughout the pattern. This leaves one area for adjustment to be considered in “basic trim”. Criterion five is to adjust the plane so that it turns the same inside and outside as well as well as having it track the same both ways. These two are grouped together as the same adjustments affect both. Step one here is to CLEAN your lines, thoroughly, twice! Re-fly and see it this helps the situation. If it doesn't solve the problem, check to be sure there is not a part of the control system rubbing somewhere. Little rubs can make big problems. If a rub is found, correct it and recheck. If this doesn't solve the tracking problem then an adjustment on the flap to elevator length is in order. If it turns faster inside than outside, shorten the pushrod length and re-test. Likewise, if it turns faster outside than inside lengthen the pushrod length and re-fly. The goal of this step is to find the best balance of inside/outside turn and tracking. If the tail flies low relative to the nose (looks like it is flying uphill) shorten the pushrod to get this close to level. Pay attention to the inverted attitude as well. The ideal result of this step is to have the plane flying level in pitch attitude and turn the same both ways. If this can't be achieved here, opt for the pitch attitude balance over the turn differential. There are ways to impact the turn differential in following sections.
To conclude the “basic trim” section we should have a plane that is flying “level” both ways, is controllable; either doesn't hinge or has minor hinging, and has “balanced tension throughout the pattern, if flying level in pitch attitude and ideally turns the same both ways. Next issue we will start the discussion on the “advanced trim” area.
The Trim Flow Chart
Flying Lines home page
This page was upated Oct. 21, 2015