Walker on Stunt

Paul Walker was the top scorer at the 2015 U.S. World Championship Team Trials. He and the other top-three finishers, David Fitzgerald (left) and Orestes Hernandez (right) will represent the United States in Australia in 2016. Photo by David Russum via Stunt Hangar.
The trim flow chart, Chapter 6: Advanced trim Part 2
By Paul Walker
October 2015
(EDITOR'S NOTE: This is the sixth installment of Paul's most recent trim flow chart update and series of articles. These articles were first published in Stunt News, the magazine of the Precision Aerobatics Model Pilots Association, and are reprinted here by permission of SN editor Bob Hunt.)
This is the final discussion on the trim flow chart. We are down to criteria 8 and 9. These two criteria, in general, are in opposition to criteria 6 and 7. Criteria 6 and 7 work to make tight/responsive corners while criteria 8 and 9 generally require a less responsive reaction to control inputs to maximize smoothness. Of course one would like to have both sets of criteria optimized at the same time. It is a rare plane that can do both very well on the same flight.
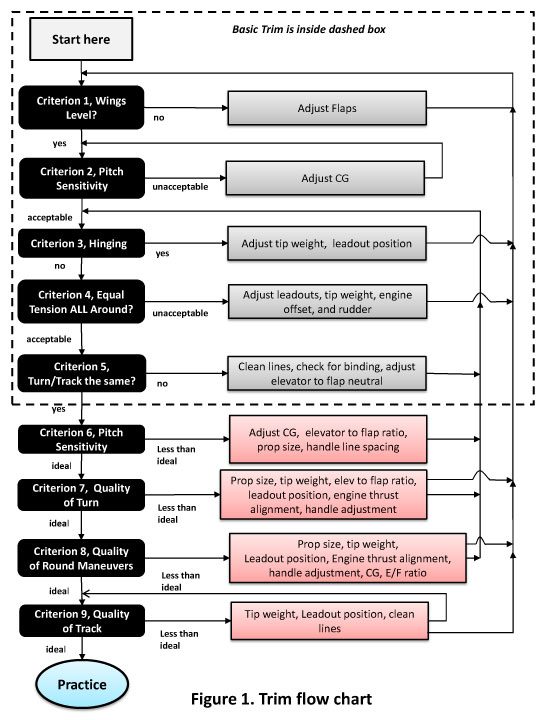
Criterion 8 is “Quality of Round Maneuvers.” Before the items that affect this are discussed, a definition of what is wanted is required. Ideally, I would like my plane to do perfect round loops with only the initial control input entered. That means no corrections as the plane goes through the entire round maneuver, wind or still air. Sounds great, but it can be an elusive target. The listed items in the Figure 1 flow chart are drivers in meeting this criterion. These items are: Prop size, tip weight, leadout position, engine thrust alignment, handle adjustment, CG, elevator to flap ratio.
In sequence, the prop diameter is first. The larger the diameter of prop, the greater the resistance there is to change in pitch. To get the same radius round loop with a larger diameter prop, more elevator deflection is required. With that comes more flap deflection. This will tend to smooth the round maneuvers which is the desired result of this criterion. One side effect of the larger diameter prop (in general) is the mass of the prop increases and as a result there will be more noticeable yaw differences in inside and outside maneuvers. Note on the Figure 1 flow chart that this change sends you back to criterion 3 to re-evaluate hinging and equal tension in all maneuvers. If there is a change in the yaw effects, it is time to decide if the increased diameter is something you want to pursue, or not. If you do, you may have to investigate a re-trim to get more equal line tension in all maneuvers. Did I ever mention that this process is never simple to maximize the planes performance? Sometimes I find that I can spend a day to a week working on one single change to verify that I did or did not like the effect of that change. There is also the direct comparison to criterion 7 that you will feel immediately. Here is the first of the compromises you will likely make. Again, this comes back to your decision on what performance envelope you are trying to work to. You now have to balance your plan with the turn and track criteria. Work through this change until you are satisfied with the result. You will either like the change or go back to the previous prop! The next thing you might notice is in the transitions between insides and outsides on the horizontal and vertical eights. The items that make it groove better can also make a clean transition harder when switching from inside to outside, and vice versa. If there is much of a lag at that point the intersection can easily have a flat spot that stands out for the judges to see. This issue needs to be watched with all the listed items.
The next item, tip weight, may surprise many of you. However, to much or too little tip weight CAN adversely affect the “Quality of Round maneuvers.” Too much tip weight rolls the plane out in the round maneuvers. This causes issues when the maneuver starts and stops with a roll out at the start and a roll in at the completion. It also affects how well the maneuver tracks when “bumps” in the air occur. Too little tip weight is the inverse of this on entry and exit and causes less line tension in those maneuvers also creating issues with “bumps” in the air. Too little or too much tip weight will require you to monitor the shape of the maneuver more closely than when the balance is correct. If your round maneuvers are not tracking as well as you desire, try changing the tip weight and re-evaluate how well it tracks after the change. This change will affect the corners as well, so be alert and consider both after this change. As mentioned earlier, the transitions will be severely affected by incorrect amounts of tip weight. Be aware!
 Leadout position can also affect the “Quality of Round Maneuvers”. Under ideal conditions, this isn't a significant player, but when the wind gets stronger or rougher, it does matter. If the leadouts are too far back, the line tension will lessen near the tops of the rounds and increase at the bottoms. In calm air this is not much of a bother, but as the wind picks up, this difference makes it more difficult to keep the maneuvers round. If you notice this, move the leadouts farther forward and try again. This starts to become more difficult to compare because you are at the mercy of nature with the wind speed and roughness. It may take more than a single flight to evaluate the change adequately. At my flying field, there are times that I call the conditions “confidence destroying air”. I seems that the plane will not track in level flight, becomes impossible to put two maneuvers in the same place, and consistent bottoms are impossible. In those kinds of conditions, it becomes difficult to evaluate subtle changes to the trim. In those conditions, it is best to either stop flying or simply just practice in the trim it is in. Sometimes a five mph wind like this is next to impossible to fly well in and then the next day a twenty mph wind is just fine! Be aware of the conditions you are flying in. As before, try a change in leadout position and evaluate the difference. Pick the best configuration.
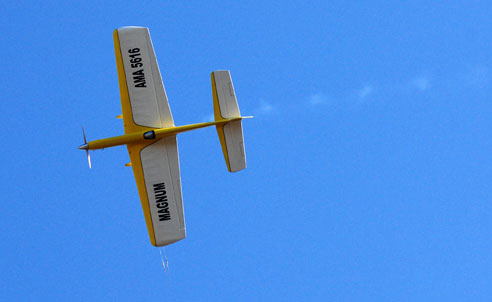
Photo: Leadout position can be seen clearly in Dave Royer's Magnum Plus, backlit in flight at the 2015 Fall Follies.
The engine thrust alignment is another option to consider. There are two variables here. One is down/up thrust (pitch axis) and the other is out thrust (yaw axis). My designs don't like engine down thrust. Yes, I have tried it, but it is no help on the Impact. However, I have heard that others have found help with down thrust. If you have trouble tracking in rounds try some down thrust to see if it improves. If it does help the tracking, make sure the balance between inside and outside corners is not upset. If it is, an adjustment to the flap to elevator pushrod length may be required to balance the corners, which in turn may change the tracking in the rounds. Engine out thrust is another option to consider. It will help to keep the yaw issues more balanced, and may even out the line tension in rounds. This can lead to better rounds. I now include in offset in all my new construction, as I have found no ill effect with the trim with engine offset with the electric power.
The handle adjustment can also impact the “Quality of Rounds”. If the spacing is too wide, minor control inputs can easily cause changes in radius in rounds, causing them to not be “round”. Likewise, if the handle neutral bias is off, there will be a difference between insides and outsides, forcing the pilot to make conscious changes to make the sizes the same. This extra focus will reduce the focus on “roundness” and cause more “unconscious” adjustments in the rounds. Be very conscious of the relative sizes of the rounds, and if they are not the same, consider an adjustment to your handle. This is another place for a good coach. The coach can watch for the sizes and help you make them the same. Be very honest with yourself with this. If you have to really bear down to make the sizes the same, it is likely your handle needs adjustment. When adjusted correctly, it should be second nature to make the sizes the same and “easy” to do.
The next item, Center of Gravity, goes hand in hand with the handle adjustment. In exactly the same vein as handle spacing, the more aft the CG the harder it will be to do round rounds. I know, as I have flown very tail heavy for years. However, it's not impossible. Flying more tail heavy makes the transitions easier and cleaner (a good thing), however, will require more continual input to keep round. Moving the CG forward will make rounds smoother, but the transitions harder to do correctly. This adjustment needs to be coordinated with the handle spacing. Move the CG forward and increase the handle spacing and evaluate that result. Of course that is going to change the feel of the corners, so this needs to be a consideration as well. I have heard people say that if the CG is too far aft the nose will rise when the power comes off. Likewise, if too nose heavy, the nose will drop when the power stops. This might be an indication of the CG, but I find that this is an indication of the plane being out of trim. I have moved my CG nearly an inch from one flight to another while in good trim, and there was no difference in pitch attitude when the power stopped. This might be an indication of the thrust line being off (up or down) or an incorrect alignment between the flaps and elevator. If you are flying an established design with a defined CG, I would suggest that you start with the CG where the designer indicates, and work with other parameters if it doesn't track as good as you would like. However, the designer usually has a set building process and their planes are built with a very similar mass distribution, and thus fly similar. However, you may have built it and use heavier wood in extreme places, and even though it might have the same mass, could easily have a different mass distribution. Also, your choice of wood may also have a different stiffness than the designers' plane, and that will also affect the trim condition. This may require a different CG to get similar results, thus you may have to experiment with the CG to establish the best combination for you.
The last item that affects “Quality of Round Maneuvers” is the elevator to flap ratio. In general, the more the flap moves relative to the elevators (based on the same CG) the better the plane will track in round maneuvers. Of course this is in direct opposition to what is necessary in corners. And, of course you have already decided what type of performance envelope you are shooting for, so that will dictate what you want to do with this adjustment. This as well is going to take some experimenting to determine what the best balance is for you. Make the flaps move more and see what the effect is. If you feel the stick force is too high, move the CG back some and try again. Of course you are going to have to balance this with the “type” of corner you want. In “general”, if you have too much flap the rounds will be harder to keep the right size as they can tend to grow in size in some wind. If there is too little flap, it becomes “easier” to make consecutive rounds top tighten up and the bottoms will be harder to find repeatedly. Fly the plane in both perfect air and a good wind to establish where you want the flap to elevator ratio.
This concludes the discussion on the flow chart. Next time I will summarize and present some general “rules” that I follow in using this tool.
The Trim Flow Chart
Trim Flow Chart Chapter 1: Basic trim
Trim Flow Chart Chapter 2: Advanced trim
Trim Flow Chart Chapter 3: Criteria problems
Trim Flow Chart Chapter 4: Turning and tracking the same
Trim Flow Chart Chapter 5: Advanced trim Part 1
Back to Aerobatics section
Back to Walker on Stunt index page
Flying Lines home page
This page was upated Oct. 23, 2015

