![]()
Walker on Stunt
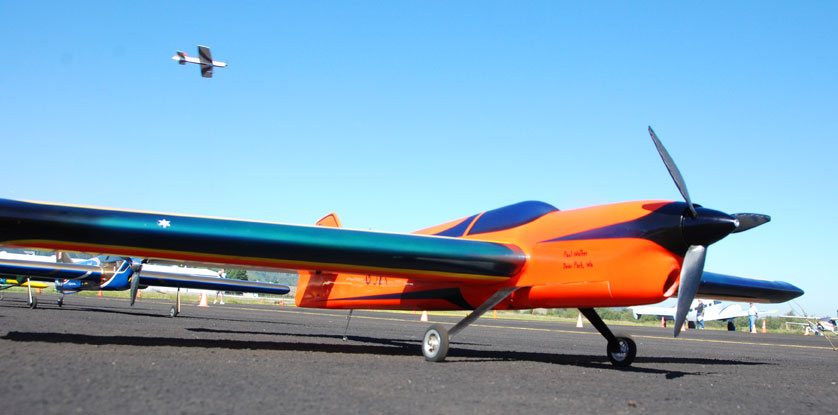
Paul Walker's Impact sits ready on the flight line at the 2014 R.F. Stevenson Memorial contest in Auburn, Wash. Flying Lines photo.
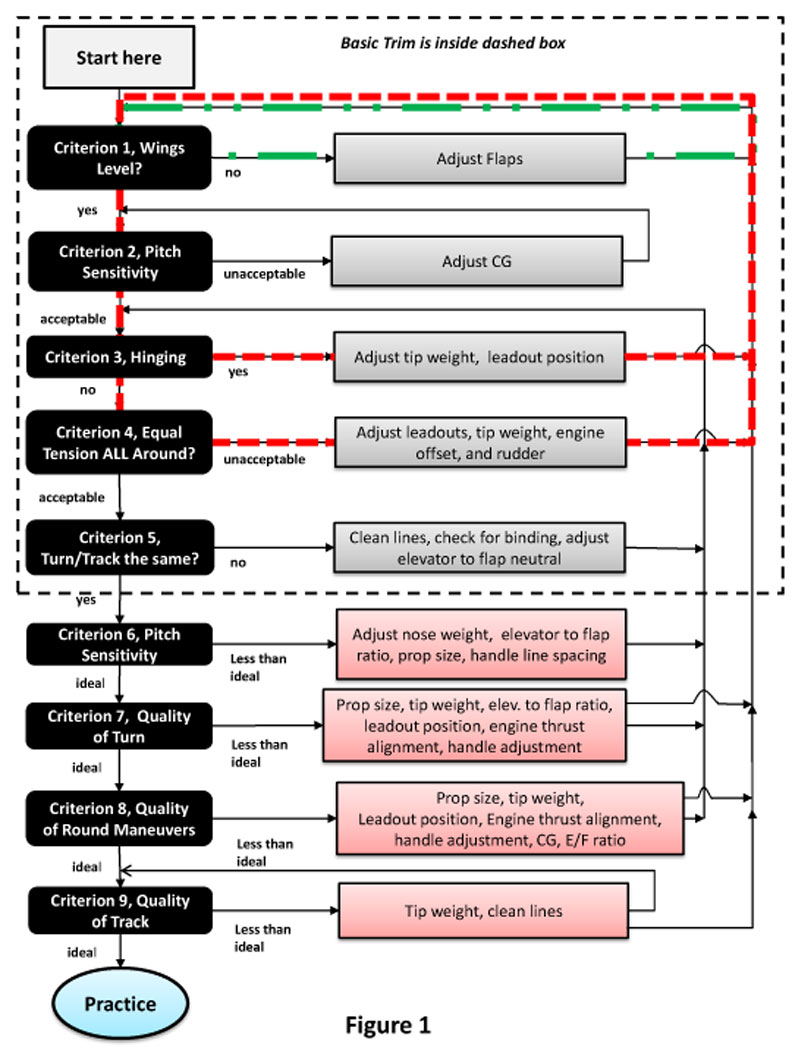
The trim flow chart, Chapter 2: Advanced trim
By Paul Walker
April 2015
(EDITOR'S NOTE: This is the second installment of Paul's most recent trim flow chart update and series of articles. These articles were first published in Stunt News, the magazine of the Precision Aerobatics Model Pilots Association, and are reprinted here by permission of SN editor Bob Hunt.)
Now that the plane is in “Basic Trim,” it is time to progress to “Advanced” trim. This is simply a continuation of the flow chart introduced last time. In this phase of trimming, you will have to evaluate each criterion similar to what is done at the eye doctor. You will experiment with different adjustments and determine which adjustment is the “best”. This is to be done for each criterion, but it also applies to the overall “best” for that plane. Sometimes a single criterion is met well, yet another can't be adjusted to suitability. This is where a compromise may need to be made. What is the best trim of the plane to maximize the points you put on the scoreboard? I generally don't like compromises and try to find “perfection” in every criterion, but reality is a cruel mistress. My World Champion plane from 1992 had a “compromise” in its trim, yet was still able to win. So all is not lost if every criterion can't be met!
 The first criterion is “Pitch Sensitivity.” The plane must turn at an acceptable rate for the pilot of the plane. From this point on in this process it becomes a personal affair between the pilot and the plane. Someone else will make different decisions at this stage of trim, so this is just between you and your plane. At this point a balance needs to be struck between how fast it will corner and how smooth it is through the rounds. You will have to decide what is right for you. If you feel you have the perfect balance between rounds and squares now and the amount of handle rotation to do that is just right, move to the next step. If it is not perfect, try some of the mentioned adjustments. Add/subtract some nose weight and recheck the feel.
Mark Scarborough's electric Profile Impact flies at the 2014 R.F. Stevenson Memorial. Flying Lines photo.
Generally as you increase the nose weight, the line tension will increase as well, which feels good! However, this can easily lead to high “stick force” and cause problems in parts of the pattern where line tension is less, as well as in dead air conditions. Flying too nose heavy in dead air, in my experience, is a prescription for finding your wake at the bottom of a triangle. After you try adding nose weight, try taking it out and then some more. Check the response in corners and rounds and then decide where the CG needs to be. If you find that spot which is best, yet there is still not a great “feel” for either the corners or rounds, try increasing/decreasing the amount of elevator deflection versus flap deflection. Yes, you have a slider in the elevator horn don't you? Increasing the elevator throw relative to the flaps will make the plane turn quicker and the rounds groove a little less. If the plane is sluggish, this might help. On the other side, slowing down the elevator will slow the corners and improve the round groove. Once this adjustment is made, reconsider the CG location you came up with earlier. Finally, the spacing on the handle easily affects the “Pitch Sensitivity”. If sluggish, increase the spacing, and if too quick, decrease the spacing. The final adjustment that can be made is the diameter of the prop. A large diameter prop will slow the corner and make nice rounds. Sounds a lot like nose weight doesn't it? In general, a larger prop will give more line tension and a more nose heavy effect on the plane. In a similar vein, a three blade versus a two blade of the same diameter will do the same.
It soon becomes obvious here that there are four significant drivers here for “Pitch Sensitivity,” and all need to be investigated. Further, all four interact with each other and sometimes it is hard to tell which parameter is the most important. That's why it is important to go through this process one change at a time to get a feel of the significance of each. This feel for the significance of each adjustment will become important later in the trim process, or at an important competition later. The object of this criterion is to have a balance between the square corners and the round maneuvers that is easily achieved by the pilot. I have flown others planes that met the first part of this (good balance) but required way too much handle throw to achieve. In my opinion, the throw should have been reduced, but this does come back to the individual pilot's preference. If should be noted that when these changes are made, they can affect some of the previous changes made. Follow the flow chart back and re-evaluate all the criteria that have previously been evaluated. Sometimes this can require a few trips through this chart to satisfy all criteria. When satisfied that a balance has been struck here move on to the “Quality of Turn” criterion.
At this point, the corner of the plane will be evaluated. Just because you have a balance from the previous step does not make a quality corner. The same plane can be adjusted differently such that both can have the same corner radius and look, yet one trim can find that corner one out of three tries and the other ten out of ten times. I know which trim configuration I want! Further, at this point the pilots' preference really begins to show. What kind of corner is desired: soft, hard, a “fly through,” a pivot, etc? Each requires a different trim to achieve consistently. The decisions made here will directly influence the scores you put on the scoreboard, as corners will make or break your final score. My criterion here is to adjust the trim so that I can make that corner ten out of ten times under pressure. Inside that criterion is what type of corner do you want? On one end is a soft corner. This one is easier to do consistently, except maybe when the wind blows quite strongly. A correctly done soft corner shows the judges your precision as you should be making better bottoms. On the other end of the scale is the tight corner. Just opposite the soft corner, this corner CAN be harder to do consistently. I also find that it is easier to do consistently in a strong wind than a soft corner. The tight corner satisfies the rules better as the rules state that a corner should be tight! The problem with a tight corner is that if you miss one everyone including your blind grandmother can see it, and your score will reflect it. Per the rules, a tight corner done correctly should receive a better score than a soft corner done correctly. In between the soft and hard corner are other corners that have distinctive characteristics. The “pivot” corner is defined by the tail dropping in the corner, and pivoting at the CG. The other extreme of this is the “fly through” corner where the tail never drops and the wing lifts all the way through the corner. In general, the “fly through” corner is closer to the soft corner and the pivot corner closer to the hard corner. Again, in general the “fly through” corner will have more flap deflection and the “pivot” corner less flap. So, the choice is yours. You need to be able to see this, and then decide which type corner you are going to shoot for.
With that said, there are other things that influence the quality of the corner. As stated earlier, the prop diameter is a player in the “Quality of Turn”. If you are shooting for a tighter corner, try a smaller diameter prop. Using a larger diameter and moving the CG aft will achieve the same corner, but will change many other aspects of the pattern. Test, but recheck previous criteria. The next item that affects corners is tip weight. As stated in the basic trim section, most people fly with too much tip weight, and pay the price for that at this point. The plane must turn CLEANLY through the corner to be very repeatable. This can be a very sensitive adjustment. The difference of a gram or two can make a significant difference in the planes ability to turn, stop, and lock. Too much or too little weight will make the stop and lock portion much more variable, thus not meeting the criterion of ten out of ten good corners. Experiment with tip weight changes in two gram increments to see the effect.
Another factor in the “Quality of Turn” is the leadout position. Many things influence the location of where the leadouts exit the wingtip, and some of that is your own flying style. For years I flew with the leadouts as far forward as possible, and now I fly with my leadouts as far aft as possible. One interesting feature of electric power is the ability to see the effect of a trim change on the performance of the plane since the power is the same every flight. When adjusting leadouts I have found that the farther forward they are the faster the plane flies. The plane is obviously flying “cleaner” with less drag. Moving the leadouts aft will slow the plane down. Before electric power I saw this but couldn't confirm it was less drag as opposed to a slight different mixture setting in the engine. Again, with electric power one variable is eliminated when changes are made. I have found that with a plane in near perfect trim, the leadout position is not critical to the corner radius but how the plane recovers from the corner is considerably different. The further aft the leadouts are the better it stops and locks in the corner. This is another trial and error check you are going to have to make. Along the same line, engine offset will influence the corner much like leadout position. Offset will act like leadouts being aft. The one problem with this trim change is that most everybody has a nice spinner to nose ring joint, and finding that you want more offset will make that nice joint ugly. In that vein, when I started flying electrics I had a cowl that could move with the engine so that this wasn't a problem. I found that two degrees offset was about ideal. More offset didn't make it fly worse; it simply didn't make it any better and started to look funny. I repeated that test on several different planes before standardizing new construction to having that built in. I have not found any place in the pattern where this hurt the performance.
The last trim device that affects the “Quality of Turn” is the handle adjustment. When the “Pitch Sensitivity” was adjusted, the spacing was adjusted to get it in the ballpark. Now is the time to re-visit that adjustment. If it feels too fast for your liking, try decreasing the spacing. Too slow a response will need the spacing to increase. In the Basic trim section where the Turn/Track criterion was adjusted, it was left with the plane tracking the same upright and inverted and a possible different response to the corners inside versus outside. If that is the case, then either a neutral adjustment or a bias in the spacing is needed. You can get almost the same affect from either adjustment. If all your bottoms are at the same height both inside and outside, then try a bias on the handle. If your bottoms are at a different height, try a neutral adjustment to fix both.
Before moving on it needs to be clear that when talking about “Quality of Turn,” it means in ALL corners of the pattern. Fixing a few of the corners is nice, but in reality all corners need to react and feel the same. This can clearly add to the number of cycles required to get through this chart. Note on the flow chart that when finished with these adjustments there are two paths out. In general, most of those changes will not affect the wing level criterion, but do re-check that when finished with the “Quality of Turn” loop. Don't be totally surprised if you find that you have impacted the wing level criterion! Also, there are many things in this loop that can impact “Hinging”. Be sure to watch for that.
The next criterion is the “Quality of Round Maneuvers” loop. If you have looked ahead you will note that most of the factors in the “Quality of Turn” loop are in the “Quality of Round Maneuvers”. However, most of the effects react exactly the opposite of what is needed for good corners. This is where things start to get more difficult, and thus will require decisions on your part as to how you want your plane to handle. For nice round loops, more flap is required. Likewise, a larger diameter prop can help make the round loops groove better. Likewise, a more forward CG will help rounds become smoother. Just as was done on the previous loop, try all of these adjustments to decide which adjustment is dominant. When satisfied (or tired of trying things), re-check your feel in the corners. This is where you will have to decide which way to go: More corner or smoother loops.
This is the point where I have always had issues. I have tended towards tighter corners and “made do” with the rounds as best as I could. Just as a reminder, I have it trimmed so that I can hit the corner I want in competition ten out of ten times. I always have my coach weigh in on the look of corners versus smoothness prior to the Nat's. The point is to put as many points on the board as possible and sometimes because of certain quirks in a plane I have to back off the corner and go for smoother rounds as a result. My point is that this still happens to me even though I have been flying the same design for a long time. Your fitness level, practice level, alertness, and varying weather conditions all affect this. My opinion is that you should adjust the corner radius (tighter) to the point of being able to do ten out of ten good corners. Corners any tighter will not yield a ten out of ten criterion. That corner will then define how smooth your rounds can be.
The final criterion is the “Quality of Track”. Nowhere in the previous discussion has the quality of the tracking been considered. In the “Basic Trim” section, it was adjusted to be the same upright and inverted, but the quality now resolved. Before we go further, I define tracking as the ability of the plane to not change its pitch angle as it flies in level flight. Sometimes the plane translates up or down on its own, but that isn't a tracking issue. If it pitches up and then down in level flight (sometimes caller porpoise), that IS a tracking issue. Fortunately at this point in the trimming process it will have likely been already been adjusted close to being quality. If it still doesn't track well, suspect friction in the control system somewhere. It can range from ball links that may have tightened up, pushrods bearing against the structure somewhere, the leadouts rubbing in the wing structure somewhere, and the obvious, dirty lines. Start by cleaning the lines to see if that helps. If it is still not tracking well, check for binds in the control system, and correct if necessary. You did check this in the basic trim area, didn't you? You can be a skilled and experienced builder, and still get binds in the control system, right Mr. PAMPA President? With even a minor bind, a plane can be downright “evil” (see previous sentence). It is my experience that the quality of track is not determined by the CG, but by the plane being in trim. Two years ago I was doing an experiment with my '12 Nat's plane and moved the CG back a full inch! Even a full inch back, it still tracked just fine. If you are using nose weight to make your plane track, it is out of trim. Hopefully after going through this process, it will be in better trim.
There is one more item that can affect tracking. That is tip weight. Too much or too little can make the plane climb or dive (pitch not translate) heading into the wind. I have found that as little as two grams tip weight can cause this. Try this change in small increments to see if there is any gain to be made here.
This overall process really doesn't take as long as it sounds like. In the “advanced” section, changes will be made for a specific criterion, and you will watch for the impact of that change on the next flight. Since you are likely doing a full pattern on every flight, you WILL see that changes effect on every maneuver. This can allow several checks to be made on a given flight, thus shortening the overall process. Now that you have arrived at this point, go out and practice with a well-adjusted plane!
Next time some of the more subtle aspects of trimming will be discussed.
The Trim Flow Chart
Flying Lines home page
This page was upated Oct. 21, 2015