![]()
Walker on Stunt

Paul Walker sights down the lines as he flies his 2015 Predator at the 2015 Jim Walker Memorial contest in Portland, Ore. An on-the-ground photo of the Predator is below. Flying Lines photos.
The trim flow chart, Chapter 3: Criteria problems
By Paul Walker
May 2015
(EDITOR'S NOTE: This is the third installment of Paul's most recent trim flow chart update and series of articles. These articles were first published in Stunt News, the magazine of the Precision Aerobatics Model Pilots Association, and are reprinted here by permission of SN editor Bob Hunt.)
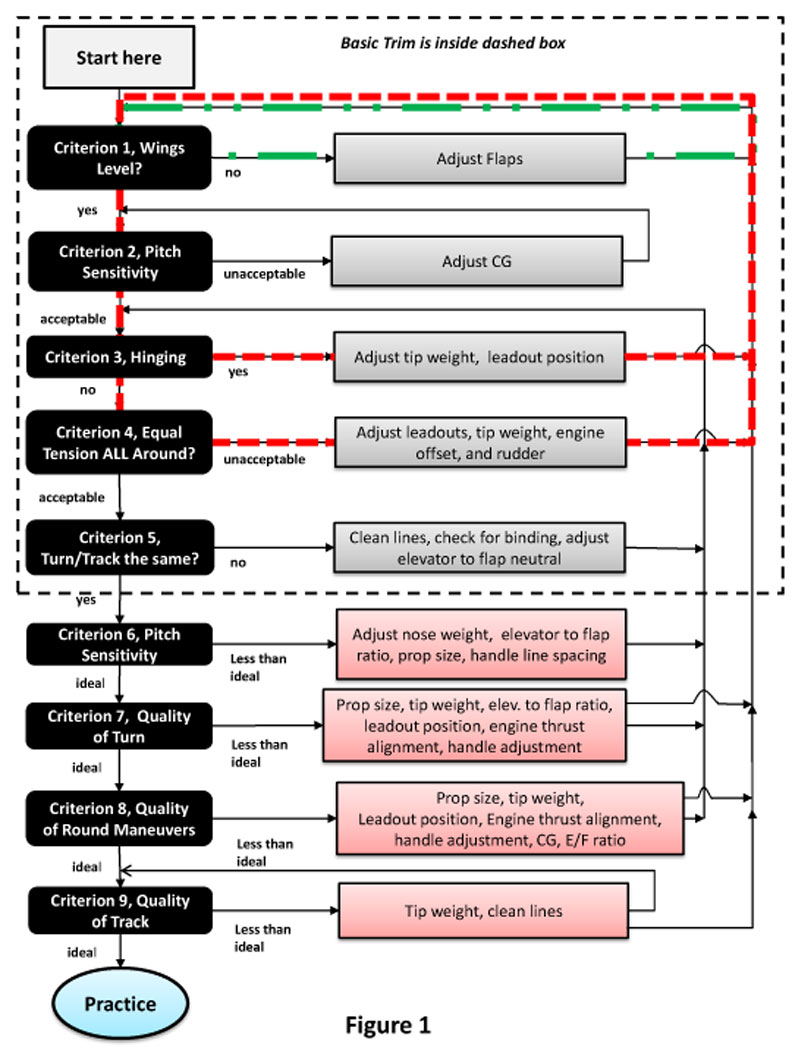
The previous discussions on the flow chart describe the ideal situation. That being everything tried results in the correct solution. However, that rarely occurs in the real world. It can be a real chore to get through the “Basic” trim section. Some of these problem areas are discussed here! I call them “Criteria problems.” This is when two individual criteria can't be satisfied with a single trim configuration. It can become quite frustrating sorting out the problem(s). Anyone who has flown a competition stunt plane knows that compromises are made to do the best pattern possible with a given plane. The goal is to minimize compromises and make your plane the best it can be. You need to be very objective about your trim and adjustments and be honest with yourself. Only then can you make the changes necessary to move to a better state of trim.
One major problem is working with a plane that is not straight. It's nice to say that you are starting with a straight plane, and no one intentionally starts with a warped plane, but it does happen. It can be adjusted well to meet certain criteria, yet will fail others. If it is corrected for the later, then the former will be out. An example would be a warp in the wing that would cause a roll. It can be adjusted to fly level (in roll) both upright and inverted. This is illustrated by the green dash -dot-dot line in figure 1. However it will fail the even line tension criterion between inside and outside maneuvers or the hinging (rolling) criterion as seen by the red dashed lines in Figure 1. At this point in trimming the equal tension should really be “similar roll response”. Is the plane rolling in on certain maneuvers causing the line tension to reduce and rolling out on other maneuvers causing the line tension to increase? Note: There is a yaw component to the line tension criteria and that will be dealt with later on. This failure to meet these criteria is because the simple change of “tweaking” the flaps solves the static situation in level flight, but when the load factor on the plane is increased, the lift is no longer balanced. As the flaps are deflected, the relative camber between the inboard wing and outboard wing is different, causing a difference in lift between the two sides, and thus a roll. For minor flap tweaks, this is not a huge issue; however, it IS a compromise in the trim process. I have been in this position before, and based on these types of responses I knew there was a warp, but was unsure if it was the flap or the wing. Since I have removable control surfaces I removed the flap and examined it carefully. When certain the flap was straight, I examined the wing closely. I wasn't until I put the incidence meter on the wing that I found a one half degree twist in the outer three inches of the inboard wing section (inboard most section). It was then flown without the flaps to verify it was all in the wing. Note: If you do this, only fly around level as you will quickly appreciate how much the flaps really do help the plane corner! Really! The same comment with respect to landing applies, as the “stall” speed goes up significantly. The wing was then straightened, re-flown without the flaps to verify the wing was then straight. When perfectly straight, then the flaps were added and the level re-checked. Now, the wing is straight and the flaps are straight with no bias adjusted in them in terms of roll. Having the flaps removable comes in handy when checking the wing for warps with an incidence meter at this stage.
 If there is a warp in the wing, it has to be dealt with. This process that follows will work for most planes. However, I have yet to do this on a foam core wing. Others have stated that they have twisted a foam wing with steam, but I have never attempted this. Most other built up wings are “easily” corrected this way. My method is to boil a gallon of water, and collect a few bath towels that have been discarded. I cover the work bench with a plastic tarp, and under the edges lay sections of a 1 x 1 to fashion a bit of a tub the width and length of the wing to catch the excess water. The fuselage straddles the 1 x 1's so that the wing is over the tub. Towels are laid in the tub so that the bottom of the wing panel that is to be twisted is touching those towels. The plane is then removed and some of that boiling water is poured on those towels, and then the plane is placed on top of those now very hot towels. Another towel is then dunked in the boiling water, and removed with a set of tongs. The towel is carefully placed on top of the wing and allowed to soak for a few minutes. The towel is then removed, and the wing then twisted to the position necessary to remove the warp. This process is similar to twisting a carbon prop with boiling water. Heat, twist, let cool and check the position. If not satisfied, repeat until it is straight. Let it cool for a few hours, and if still straight, reassemble and perform a flight check.
How close is close enough? If the flaps are only a few degrees different, providing they are straight, it is probably close enough. I strive to have the flaps without any bias to each other as this difference will eventually create minor issues later on in trimming. Other designs use a segmented flap that has a separate outboard section to adjust wing level. This keeps the flaps unbiased but its effectivity will change based on the AoA (angle of attack) of the wing. This will add a roll imbalance that “could” create issues in later stages of trim. It will come down to you adjusting and checking the loops highlighted in Figure 1 to be sure the criteria are met.
Now that the wing and flaps are straight, you may still experience problems meeting all the criteria. Another issue that creates a similar problem of a warped wing is having the vertical CG “off”. I use the term “off” as being in a location that creates the issue about to be described. However, you say that you hung the plane from the leadouts and used a plum line or laser level to check the orientation of the wing and it was exactly normal (perpendicular) to the ground. I have done that as well, and my 2011 Nat's Impact XS didn't hang normal to the ground. I measured the offset at the outboard tip, and calculated how much the battery had to move to make it normal to the ground. I made that shim, and then rechecked the offset. It hung perfectly normal to the ground. I then immediately took it to the field and flew it. This is a plane that just finished second at the Nat's and second at the Team Trials, so it was a pretty fair airplane. I re-leveled the wings and then proceeded to fly the pattern. It was HORRIBLE. It had the previously described problem of a major imbalance between insides and outsides. The only thing that fixed it was to put it back the way it was previously! I have checked the wing and flaps for warps, but none were found. The point here is just because it hangs perfectly from the leadouts, don't assume all is well.
An incorrect vertical CG can be especially noticeable on the top of the vertical eight, hourglass and the overhead eight. Because of the vertical CG being “off”, the flaps had to be tweaked a bit to balance this. In level flight this isn't a big problem but once again during maneuvers with the higher load factors the tweaked flaps will cause a roll. Of course, the flaps can be tweaked to make the maneuvers balanced in roll, but then the wings aren't level upright and inverted. This is the same problem that was discussed earlier. What to look for? If the plane is loose on outsides and tight on insides, suspect that the vertical CG is too low. For an IC powered plane, moving the CG up is a bit problematic. Try some clay weights on the CG on the top of the fuselage. This will require a flap re-tweak to get the wings level. Once the wing is re-leveled, check for the inside-outside balance in roll. If it helped but didn't completely solve the problem, add some more clay and try again. For electric power planes, it MAY simply involve moving the battery up some.
Another tipoff that the vertical CG may be off is that the plane may hinge inside but not outside, or vice versa. Just as described above, this hinging can be balanced with a flap tweak, but then the level flight will be off. Sounds just like what was discussed earlier! This assumes that there are no anomalies with the airfoil section on your wing. Bumps and sharp edges can cause no end of grief, so be careful with this when building.
At this point the wings should be level, and the maneuvers balanced in roll. The line tension may vary between inside and outside due to yaw issues, but the roll response will be the same. The line tension issue will be taken care of with other subsequent adjustments.
Now that the wing is straight (and the flaps as well) it should be able to satisfy the criteria. These criteria are at the very start of the flow chart, and I can't emphasize enough the importance of getting this correct at the very beginning of the trimming process. It will make all the following adjustments that much easier. If this warp is not corrected early, and much time is put in later, you will end up going back to step one any way, and have to start over when the warp is corrected. This leads to a subtle thing that happens when going through this process. That is that many trim changes will act differently when the plane is in a different state of trim. A good example of this is wing tip weight. When the plane is in “perfect” trim, I can tell the difference in ONE gram of tip weight. No B.S. here, it is a fact! In fact the “magic” trim change I made at the 2013 Nat's was to add two grams of tip weight. I know that in other trim configurations I had it in, I could not feel two grams of tip weight, and it realistically made no difference. That in itself was a clue that the overall trim it was in at the time was not optimal for me.
Converse to that argument, there are certain trim changes that become insensitive to adjustment when the overall trim hits the “sweet spot”. On the 2012 Impact, that insensitive item was leadout position. One afternoon in the fall, I actually moved the leadouts all through a range of 1.0 inches, with minimal affect. This was when it was in the trim from the Nat's of that year. Prior to the Nat's, it was more sensitive to the leadout position, yet in this other configuration it was relatively insensitive. This phenomenon is real. The point I am trying to make is that you should remember (or write in a log book) what happened to the plane after a certain trim change was made, for your use at a future time. BUT, don't be totally surprised if it doesn't work exactly the same in your current configuration.
In the next installment, the criterion 5, (turn and track the same) will be discussed in more detail.
The Trim Flow Chart
Trim Flow Chart Chapter 1: Basic trim
Trim Flow Chart Chapter 2: Advanced trim
Trim Flow Chart Chapter 4: Turning and tracking the same
Trim Flow Chart Chapter 5: Advanced trim
Back to Aerobatics section
Back to Walker on Stunt index page
Flying Lines home page
This page was upated Oct. 21, 2015