Modeling thought for the month:
An investment in knowledge always pays the best interest.
-- Benjamin Franklin
When you've written for model airplane publications as long as I have, after a while it becomes a challenge to think up new topics for the next column. That's why I got a bit behind on keeping this "monthly" general interest column up to date. After all, I've written about a two hundred of these, if you count the Flying Lines newsletter as well as the Web -- and the column I wrote for Model Builder magazine for eight years.
 So I got the idea of going back into the archives to see
if there were some old topics that could be updated and renewed for a contemporary
audience. I decided a good starting place would be the Model Builder
column. It was written for a nationwide (actually, worldwide) audience,
and therefore often covered general CL modeling topics that might well be
worth revisiting.
So I got the idea of going back into the archives to see
if there were some old topics that could be updated and renewed for a contemporary
audience. I decided a good starting place would be the Model Builder
column. It was written for a nationwide (actually, worldwide) audience,
and therefore often covered general CL modeling topics that might well be
worth revisiting.
I dug out my first MB column, which appeared in the May 1988 edition. It turned out to be an unexpected trip down Memory Lane. I tend to think of my MB columnist period as just a little while ago. Yet I started writing that column 21 years ago! I took the column over from my racing/Flying Lines partner Mike Hazel, and wrote it for the last eight years of the magazine's existence. As a matter of fact, there are still four columns floating around out there in the unpublished void -- submitted for editions of the magazine that were never published. (Also a few magazine paychecks, but that's another story.)
So, yes, a lot has changed both in my life and in modeling in the ensuing period -- but a lot stays the same, particularly on the modeling end of it. True to my original idea, there's quite a bit in the column that I can update and present (below) that might be of use to new readers.
But, oh, my, the changes.
I started that first column with an introduction. I noted that Mike and I were the Nitroholics Racing Team. Still true, but now it's more the Nitroholics Racing/Stunt/Combat/Speed/Reminiscing-about-the glory-days Team. A lot less racing and a lot more reminiscing. But we're still an active team in the world of modeling journalism, CL competition and contest organization.
The column said that I was a 37-year-old newspaper copy editor. Oops, gotta update that. Now I'm a 58-year-old newspaper copy editor.
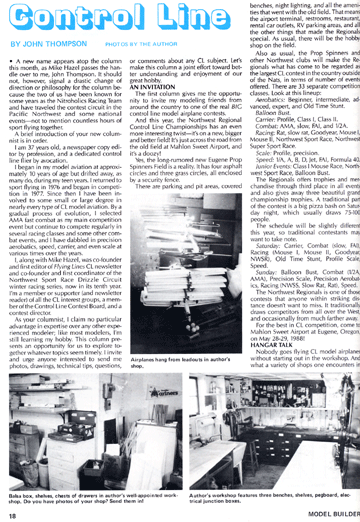
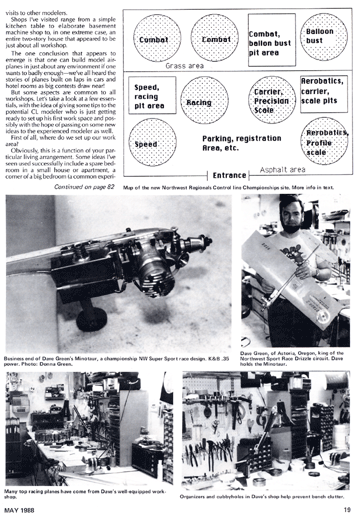
Photos: Two-page opening spread of of the May 1988
Model Builder column
featured photos of workshops and Northest racer Dave Green (and his Super
Sport plane).
The modeling resume is about the same, just longer by 22 years:
 I began in my model aviation at approximately 10 years
of age but drifted away as many do, during my teen years. I returned to
sport flying in 1976 and began in competition in 1977. Since then I have
been involved to some small or large degree in nearly every type of CL model
aviation. By a gradual process of evolution, I selected AMA fast combat
as my main competition event but continue to compete regularly in several
racing classes and some other combat events, and I have dabbled in precision
aerobatics, speed, carrier, and even scale at various times over the years.
Update: All the above is true, except that in the past 22 years I have gradually
shifted to an emphasis on stunt flying, competing in Precision Aerobatics,
Classic and Profile Stunt, and decreased the racing and combat participation.
I retired from fast combat after the 2000 season but came out of retirement
last year, just as the event itself is in its dying days. Oh, well.
I began in my model aviation at approximately 10 years
of age but drifted away as many do, during my teen years. I returned to
sport flying in 1976 and began in competition in 1977. Since then I have
been involved to some small or large degree in nearly every type of CL model
aviation. By a gradual process of evolution, I selected AMA fast combat
as my main competition event but continue to compete regularly in several
racing classes and some other combat events, and I have dabbled in precision
aerobatics, speed, carrier, and even scale at various times over the years.
Update: All the above is true, except that in the past 22 years I have gradually
shifted to an emphasis on stunt flying, competing in Precision Aerobatics,
Classic and Profile Stunt, and decreased the racing and combat participation.
I retired from fast combat after the 2000 season but came out of retirement
last year, just as the event itself is in its dying days. Oh, well.
More from the May 1988 column:
I, along with Mike Hazel, was co-founder and first editor of Flying Lines CL newsletter and co-founder and first coordinator of the Northwest Sport Race Drizzle Circuit winter racing series, now in its tenth year. I'm a member or supporter (and newsletter reader) of all the CL interest groups, a member of the Control Line Contest Board, and a contest director. Update: Flying Lines shifted from a print publication to this Web site in 2006, after Mike and I had swapped the editing job several times. The Drizzle Circuit lasted 12 years, and I still miss those winter contests. The Control Line Contest Board was split into separate event boards, and I remain on the racing board.
As your columnist I claim no particular advantage in expertise over any other experienced modeler; like most modelers, I'm still learning my hobby. This column presents an opportunity for us to explore together whatever topics seem timely I invite and urge anyone interested to send me or comments about any CL subject. Let's make this column a joint effort toward better understanding and enjoyment of our great hobby. Update: That's all still true, though I would add that input to any aspect of the FL Web site is welcome and wanted.
Talk about changes: The May 1988 MB article had a section on workshops (updated below), and the photos include the shop I was using at the time in the basement of a house in Cottage Grove, Ore. At this writing in 2009, five shops later, I build my airplanes in the garage of a house in Eugene, Ore., that appears considerably more cluttered than the one in the MB picture.
From here on, this column is based on the original May 1988 Model Builder column, but updated to reflect current conditions and/or knowledge. I hope you find it useful. If it seems so, I'll be updating some other old MB columns in the future.
This column gives me the opportunity to invite my modeling friends from around the country to one of premier control line model airplane contests.
In 1988, the Northwest Control-Line Regionals (then called the Northwest Regional Control Line Championships) was moving to a new site. Here's a twist: That new site was the "new site" the Regionals moved to (again) in 2006!
 It was a bigger and better field than the field that had been used from
1972 through 1987, which was across the road nearer to the Eugene Airport
terminal. The old site had one asphalt circle and four grass circles, and
the new site had three asphalt and four grass. After a few years on the
new site, the Regionals moved to Roseburg for several years, to Albany for
four years, and back to the "new" Eugene site in 2006, where it
remains for the 2009 event.
It was a bigger and better field than the field that had been used from
1972 through 1987, which was across the road nearer to the Eugene Airport
terminal. The old site had one asphalt circle and four grass circles, and
the new site had three asphalt and four grass. After a few years on the
new site, the Regionals moved to Roseburg for several years, to Albany for
four years, and back to the "new" Eugene site in 2006, where it
remains for the 2009 event.
The site is actually an overflow parking area for the airport, seldom used for that purpose. It's the home field of the Eugene Prop Spinners club. The seven circles are enclosed by a security fence.
Photo: Appearance judging for Precision Aerobatics
at the 2008 Northwest Regionals. Flying Lines photo.
There are parking and pit areas, covered benches and plenty of room for camping -- and even a wind sock. Rest rooms and food concessions are brought in for the contest. The airport terminal is close by, with a restaurant and rental car outlets. The contest has a host hotel about 15 minutes away, and hands out guides to the city and local dining options.
The contest, in 1988 hosted by the Prop Spinners, is now conducted by a special club that exists for that purpose alone, the Northwest Regionals Management Association. The Regionals remains one of the largest CL contest in the country outside of the Nats, in terms of number of events offered. In 1988 it was a two-day contest with 33 separate competition classes. It's now a three-day meet which grew as high as 42 classes. In 2009, there will be 35 classes. Here's the lineup for 2009, compared with 1988:
Aerobatics; Beginner, Intermediate, Advanced and Expert Precison Aerobatics, Old Time Stunt, Classic Stunt, Profile Stunt (expert and sportsman classes). Classic and Profile did not exist in 1988.
Carrier; Profile, Class I, Class II, .15 and Nostalgia Classes I-II. The .15 and Nostalgia classes did not exist in 1988.
Combat: High-performance 1/2-A, 80mph and Vintage Diesel. In 1988, the lineup was AMA, slow, FAI, and 1/2A.
Racing: Class I Mouse Race, Northwest Sport Race, Northwest Super Sport Race, Flying Clown Race. In 1988: Rat, slow rat, Goodyear, Mouse I, Mouse II, Northwest Sport Race, Northwest Super Sport Race.
Scale: Profile, precision, sport. Sport scale did not exist in 1988.
Speed: 1/2-A, 1/2-A Proto, A, B, D, FAI, Jet, Formula 40, .21 sport, .21 Proto, NW Sport Jet, F2D Proto. In 1988: 1/2-A, A, B, D, jet, FAI, Formula 40.
One event that was on the 1998 schedule has long ago been dropped: balloon bust.
The Regionals offers trophies and merchandise prizes and also gives out event category championship trophies. If you've never been to the Regionals, join us for the 38th annual, at Eugene Airport, Eugene, Ore., on May 22-23-24.
See Where the Action Is for updated details on the Regionals.
Nobody goes flying CL model airplanes without starting out in the workshop. And what a variety of shops one encounters in visits to other modelers.
 Shops I've visited range from a simple kitchen table to elaborate
basement machine shop to, in one extreme case, an entire two-story house
that appeared to be just about all workshop.
Shops I've visited range from a simple kitchen table to elaborate
basement machine shop to, in one extreme case, an entire two-story house
that appeared to be just about all workshop.
The one conclusion that appears to emerge is that one can build model airplanes in just about any environment if one wants to badly enough -- we've all heard the stories of planes built on laps in cars and hotel rooms as big contests draw near!
But some aspects are common to all workshops. Let's take a look at a few essentials, with the idea of giving some tips to the potential CL modeler who is just getting ready to set up his first work space and possibly with the hope of passing on some new ideas to the experienced modeler as well.
First of all, where do we set up our work area?
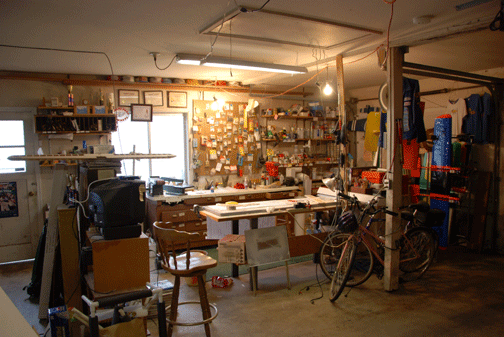
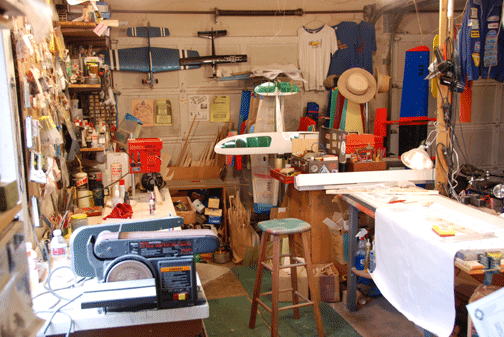
Photos: Current Flying Lines workshop.
Organized clutter! Flying Lines photo.
Obviously, this is a function of your particular living arrangement. Some ideas I've seen used successfully include a spare bedroom in a small house or apartment, a corner of a big bedroom (a common experience for teen-agers still at home), or even in a big closet. An outbuilding with a wood stove was my shop for several years. A garage is a natural if you have a way to heat it. The best of all worlds, of course, is a nice basement.
 Just about any space can be made to work with some careful
planning and organization. And these are key words. just as practice is
the key word to success in competition, planning and organization are the
keys to success in building models in confined or less than ideal spaces.
I'll add a couple of other key words; cleanliness and safety.
Just about any space can be made to work with some careful
planning and organization. And these are key words. just as practice is
the key word to success in competition, planning and organization are the
keys to success in building models in confined or less than ideal spaces.
I'll add a couple of other key words; cleanliness and safety.
The shop needs to be planned to make sure that you can find and get to everything you need while you're building. The smaller the shop, the better you need to be organized. Careful use of pegboards, drawers, shelves, and bench organizers (those little boxes of tiny drawers available in hardware stores) will help make the building job enjoyable.
Cleanliness is not just a matter of keeping things looking nice. Some methods of dust control is a must for making finishes turn out right, for example. Glues won't cure properly on dirty oily, or damp surfaces. Trying to work in a messy shop where tools hide under and behind piles of junk is a nightmare. Always putting away tools after their use, or at least after each building session, makes the next session a lot easier
The reason for safety in a work space is almost self-evident. No shop should be without a fire extinguisher and some first-aid equipment. Electrical connections should be examined for safety, and the load of any simultaneously used power tools should be spread out among circuits. Knives should be stored carefully out of elbow-bumping reach, and power tools should be out of reach of children and properly mounted and located for safe use.
Assuming you've met all the above criteria in picking out and setting up your first, or new, shop, what should it have in it?
At the very basic level, you need to have the tools and supplies needed to put modern model airplanes together For the youngster or novice, remember: It can be done with out huge expense. I will list some things here that should be considered basic necessities and then follow with those desirable tools that can make the job easier.
In the old days of our modeling, the basic cutting tool was a simple razor knife. There simply wasn't much else for the youngster with a tight budget. Even today, most model airplanes could, if they had to, be built with the use of justt his one cutting tool -- though the choices of brands and types are now much broader. In addition to your knife, you'll want a drill, scissors, wire cutter, and a small razor plane. A variety of grades of sandpaper from 80-grit to 400-grit will be needed, and sanding blocks are cheap and important for good finish work (you can make one out of a block of wood if necessary).
As your experience grows, you will want to add basic power tools. The most basic and most useful tool for an intermediate modeler is a Dremel Moto Tool or similar grinding tool, which comes with a variety of bits. This is one of those "I don't know how I lived without it" tools. A Dremel Moto Saw or Moto Shop will add the ability to saw single and multiple wood parts and thin aluminum. Again, this will see a lot of use in any modeler's shop. An electric drill is standard equipment in most workshops, model or not. Beyond that most cutting tools are in the "luxury" class for most hobby modelers-band and table saws, lathes, machine tools, etc. all make model work easier but are not essential. Since the 1988 column, I would add that a bench grinder and belt sander are pretty close to indispensible shop tools.
If you plan to use the modern plastic coverings, you want to acquire an inexpensive modeling iron and heat gun -- look in any hobby shop or mail-order house ad for choices, but a household iron will do in a pinch.
A fairly standard array of normal workshop tools is desirable -- pliers, screwdrivers (many CL modelers prefer Allen-head bolts and would use hex wrenches), and so forth can be gathered up fairly inexpensively. Obviously, the miniature variety is the best type for model building. I'd also suggest watching garage sales or swap meets for some dental tools, tweezers and other small, handy items that will make building easier.
Once again, the old days were different. A tube of Ambroid seemed to be all one needed to build perfectly good model airplanes. Once again, we still probably could build with just one tube of glue but would prefer to use the variety of adhesives now available fora variety of specialized jobs.
I once found myself using seven or eight different kinds of glue in a single airplane; however, I'm down to two or three nowadays. These are what I consider to be the essential adhesives of a modern CL modeler's shop:
Cyanoacrylate: Hot Stuff, Zap, Jet, etc. In 2009, my favorite brand is the Bob Smith line. These are the instant glues that make model building such a quick affair compared to the old days. They are very lightweight and good for any place where you have tight joints and moderate stress. I always keep on hand a regular thin instant glue; a thicker, gap-filling variety; and a bottle of kicker to make "instant" even quicker If you're working with foam airplanes, there's a special type of CYA glue that won't dissolve the foam.
White glue: Tite Bond or Elmer's Carpenter's Glue. These are very strong, medium-weight glues that are good for such jobs as gluing foam to wood, wood to wood where weight is not critical, etc. These are sandable to varying degrees.
They should be used in applications where air can reach them to aid drying and where some shrinkage would not be a problem.
Epoxy: Epoxy (two-part glues) should be used in all high-stress locations such as motor mounts, wing joints, bellcrank mounts, etc. These are the heaviest glues and should be used sparingly and only where their strength is absolutely necessary. Epoxies come in several setting times, ranging from five minutes to two hours. The slow-curing variety is best for the most critical joints and those involving hardwood, such as motor mounts. The five-minute variety works everywhere else, as long as you have enough working time. I've found the 30-minute type to be quite handy for those in-between jobs, and it tends not to have the annoying odor of the five-minute types. There are several good brands: Bob Smith, Hobby Poxy, Sig, Devcon.
For the modeler working in a confined space or setting up a first shop and trying to save money, wood, covering materials, and finishes (paints, dopes, etc.) are best purchased as needed, though bulk prices on mail-order balsa often are a good alternative for stocking up. People who build mostly from kits will find a large inventory unnecessary. Over time, modelers tend to build up quite an array of these supplies. Don't overlook the need for metal; music wire, tubing, and brass sheet in various sizes. Most local hobby shops have a good supply of all these materials.
At the very least, you need a straight, stiff building board. This can be part of or on top of a fancy custom-made wor bench or a simple board that can be stored in a broom closet and placed on the kitchen table. But it must be straight and it should have a soft surface that pinscan be put into, such as the wallbaord available in building supply stores. Jigs, guides, etc. can be added as needed. A good metal straightedge is essential, as are a square and a triangle for checking alignment.
One way to assure that you have a perfectly straight building surface is to purchase a thick piece of glass to put on top of the building board, then top it with wallboard. This kind of board can be portable, though it will be heavy!
A vacuum cleaner helps for dust control and a sink nearby also is helpful. A good trash can is eminently preferable to letting scraps drop on the floor. If you're a music lover, a pair of cheap speakers, and a wire to your living room stereo is a divine way to combine your favorite tunes with your favorite hobby
You'll need to be creative in the use of your own particular space to find ways of storing airplanes and works in progress, along with your growing collection of general model miscellany. In my outbuilding shop, I hung coat hangers (cut and bent to provide a double-hook) to hang airplanes by their tails. In my 1988 basement shop, which had a low ceiling, I made a wire of several strands of old control lines and hung the airplanes by their leadouts. Combat expert Gene Pape, who works in a spare bedroom, has his combat planes hung by their leadouts in a coat closet. Mike Hazel strings two wires across the ceiling and rests the wings on them. But here's my current trick: I purchased two simple take-apart, wheeled, tublar clothing wracks from Sears many years ago. I hang the planes by their leadouts from the bar. The two racks hold an incredible number of planes in a tiny space.
A separate cabinet for engines, preferable one that could be locked, is a good idea.
An essential for any shop is a place to organize and store model magazines, books, catalogs, brochures, etc. Shelving and drawers are good for this purpose. Make sure things are organized in a fashion that allows you to find what you're looking for at the moment you need it.
Ifs difficult to work in a dimly lit shop; it's hard on the eyes and the lack of light hides many little flaws that will show up unflatteringly in the sunlight of the flying field. Wherever you work, take special pains to arrange for bright lighting in all areas of the shop.
I also find it very helpful to provide multiple electrical outlets. Inexpensive junction boxes can be obtained from hardware stores, providing a place to plug in your var-ious power tools. An overhead rack to hang the tools on allows you to keep them plugged in. You can turn everything off when you quit work by using the junction box switch. Be careful not to use too many electrical devices at once when they are plugged into the same box.
Pegboards, old chests of drawers, organizers, shelves, etc., creatively arrayed, provide homes for all the little gizmos that collect in a shop. Again, a pre-planned storage system is a timesaver. Garage sales are a great place to pick up shop furniture. If you find something better later on, you don't have much invested and can throw the old stuff out.
Watch for sales at hobby shops moving or going out of business. In addition to being a way of picking up bargains on bulk items like balsa wood, it also is a way to pick up racks for various kinds of materials. For a while I had a large balsa wood rack obtained in just such a sale, which I once filled with balsa picked up at a fraction of its retail value from a shop that was closing down.
Another little luxury is a bulletin board for pinning up pictures of your favorite airplanes, flying sessions, magazine clippings, or contest flyers.
These are just a few ideas about workshops, to which readers could add their own experiences.
I've enclosed a few workshop pictures as examples. How about you sending a shot of your workshop for publication in a future column? Point out the special tricks you've learned for making modeling enjoyable on those rainy, windy days when flying is out of the question.
As mentioned earlier, your comments, questions, photos, and information are invited. E-mail John Thompson
--jt
This page was updated March 10, 2009