This is the first in a series of articles on my quest to build a computer-controlled foam cutter. It is written as the process has evolved over three years.
For years I had heard about one Bill Maywald was using to cut Allanplane wings. Perhaps the biggest motivator was my last adventure using female templates. Although I managed to cut wing panels, I spent more time maintaining the templates than cutting; thus off to the internet to see what is available for foam cutting. Much to my delight, I found some possibilities. About that time, I heard Steve Stewart had built a computer controlled foam cutter. I contacted Steve and he gave me some links to research. Now the internet sites have assembled systems for around $2000. If I can get it to work for less than $2000, then I will have saved some money -- famous last words.
There are four major elements to this system: the electronics to power it, the electronics to control it, the software to run it, and the mechanical structure.
I am approaching this project the same way I approached learning to build molds to cast propellers. Sometimes you start a project for the experience and hope that it is a good one. If it is not a good experience, then how many new tools can you justify for your workshop.
Well the first tool I needed for the electronics was a good soldering iron. I can remember my high school electronics class and trying to build a radio using a Weller gun. In fact, I built a Heath Kit Volt Ohm meter using a similar gun. I still have the Weller guns but for this project, I needed better heat control. The tool collection started with a new digital soldering iron. From my experiences with the Weller guns, I knew that soldering was not a skill that I had mastered. I decided to see what was available from the local community college. Not much there, it appears that with outsourcing manufacturing off shore has eliminated the need to teach these skills. Back to the internet where I found some cheap kits and parts to practice with. The internet also provided a user group of people who have been building or attempting to build CNC hot wire foam cutters since 2002. This site has over 9000 post. Well, might as well learn from others. I read about 300 of these a day. Occasionally something of interest popped up.
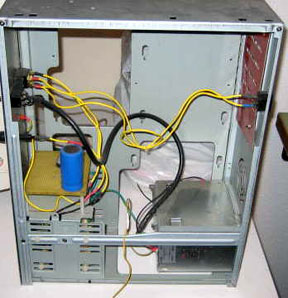
The first project I tackled was modifying a computer power supply. This has to be modified to provide power for the electronics. Finding one of these was not a problem - a quick visit to my work computer bone yard and I had a power supply. Well it was not quite that easy, I had to talk to the IT guy - I now have more information about power supplies than I can ever use - time to melt solder.
The instructions come with a photograph. Why was I not surprised when I opened up my power supply and it did not match? The modifications that have to be made include bundling like colored wires together, cutting, and taping them. A switch has to be wired in and two resistors placed in parallel.
The instructions I downloaded from the internet require replacing the power supply switch with a double pole double throw. Time to go to Radio Shack and get one. The switch that needs replacing has four terminals plus a ground on the front of the switch. The cable feeding the switch has five wires. The Radio Shack switch has six terminals. I think I can figure out what to do with four of these, but I am at a loss as what to do with the ground. Since power supplies vary, there is no room in mine to mount the switch as shown in the instructions. Time to drill a hole in the case.
If you read my adventure into molding props you will see that I did not buy the new drill press because a new model was coming out with a laser - how cool is that? Well it is not in my shop and my bench top unit does not have the travel to drill the hole. The electrical drill and Dremel were called into action to drill and open up the hole for the switch. Next came the resistors.
At the start of the project, I owned three Volt Ohm meters. The first of these was a Heath Kit that I built 30 years ago. One was my Dad's, and the third one had been purchased from Radio Shack. I wired in the resistor and checked the resistance - nowhere close to what it should be. How could Radio Shack mis-package resistors? Off to Radio Shack to get two more resistors. While I was there, I decided it would be a nice addition to this project to get a digital Volt Ohm meter. When I got home, I pulled out the new meter, and checked the resistors. To my surprise, I discovered that I owned two good resistors and three bad Volt Ohm meters. Well every project has value, and in this case, three VOM went in the trash freeing up shelf space.
 With the power supply modified, it is time
to see if it works, or if it will release magic smoke. The instructions
say do not operate with the case off the power supply. I run all my workbench
tools through a surge protector. So I turned it off, turned the power supply
on, set it a safe distance away, plugged it into the surge protector, shut
my eyes, and turned on the surge protector. The fan came on and no magic
smoke. Next step was unplug and reassemble the case and check for output
voltage. Right on spec. The power supply is complete.
With the power supply modified, it is time
to see if it works, or if it will release magic smoke. The instructions
say do not operate with the case off the power supply. I run all my workbench
tools through a surge protector. So I turned it off, turned the power supply
on, set it a safe distance away, plugged it into the surge protector, shut
my eyes, and turned on the surge protector. The fan came on and no magic
smoke. Next step was unplug and reassemble the case and check for output
voltage. Right on spec. The power supply is complete.
I needed a new power supply for the hot wire. On the CNC web site, I found a schematic for a power supply. Allied Electronics had all the parts and a week later, I was ready to build my power supply. I opened the shipping box and started removing parts and pieces. I had not planned to assemble resistors. A lack of packaging allowed the transformer to roll around in the box turning parts into pieces and damaging the transformer. A call to Allied and I had a replacement order.
I assembled the pieces and plugged the unit in to the outlet. To my surprise, it worked. Two for two on the electrical side of the project. Using an old computer housing, I mounted the CNC power supply and the hot wire power supply into the same housing. I made a faceplate for the housing out of a piece of aluminum sheet.
In photo at right are the two power supplies combined into the old computer housing.
Well, I survived the first electrical adventure, next I will take on the mechanical assembly.
This page was upated Oct. 29, 2013