![]()
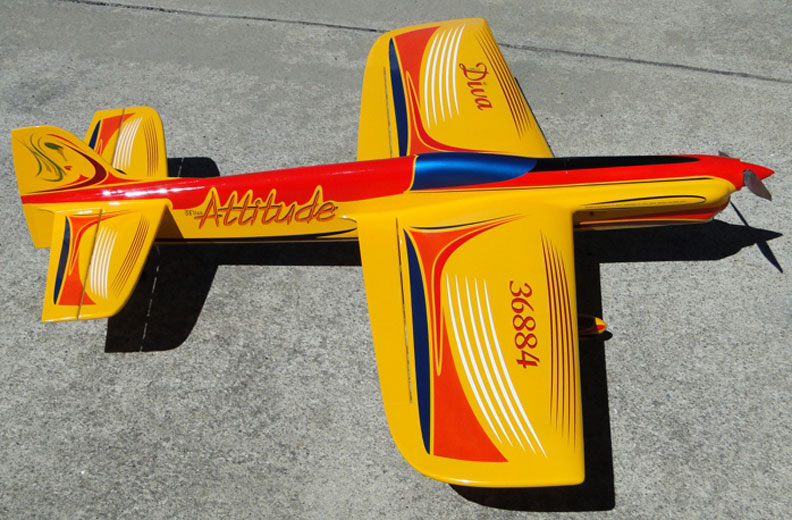
Phil Granderson's planes regularly appear on the front row of Precision Aerobatics appearance judging and have won concours d' elegance awards. He describes in this article how he gets those beautiful finishes. Phil Granderson photo.
An award-winning finishing system for your stunt plane
EDITOR'S NOTE: In the January 2007 edition of Model Aviation magazine, Phil described the straightforward system he uses to get those fabulous finishes on his Precision Aerobatics planes. He has updated that article for Flying Lines readers. Follow his system exactly, and your plane will be a concours contender, too!
If there is a single topic people ask about it is finishing. Much of the work I've done has been circulated, modified and printed by others both with and without my knowledge. Because it is still such a hot topic, here is the total unabridged updated version of the finishing system I created 15 years ago. It has consistently produced award-winning finishes for me and others.
Some of the following may cause cringing or absolute refusal to believe or even consider ever trying. I understand, that's exactly how I was 15 years ago. While it is difficult and probably impossible to change decades of stunt lore or personal experiences, I can only submit my airplanes as evidence that things are different now. With roughly 1,600 hours devoted solely to finishing over the past 15 years, when it comes to finishing, for me there is “NO FEAR.”
The most important part of the finish is the preparation for color. The most important tool you will ever own is sandpaper. It is by far the most important tool for finishing. If you want a first class finish you will have to become good friends with a variety of types and grits of the stuff. There is definitely an art to sanding and the key is touch. Remember, sandpaper is a tool. Let the tool do the work. It sounds simple, everyone knows what sandpaper is and we've used it for many years, so why is it such a big deal? Personally, it took me 30 years to figure out how to use this most basic of tools and another 10 years to perfect my technique. Frankly, I could have cut my learning time down to a few days were it not for stubbornness and trying to find some magic paint, spray equipment or super polish. Today I can say with relative confidence, there is no magic paint, spray equipment, super polish or some new stuff that will produce a quick easy front-row finish in a few hours. So get out your elbow grease and let's all agree to stop the crazy search for some sort of instant magic and get to work.
My current finishing method uses KBS Diamond Finish Clear as to seal the bare wood. Brodak or Randolph dope mixed with talc is used for sanding filler. I use automotive base coat for color but dope still works great if you can tolerate it. Final coat(s) are automotive clear. My preference is PPG D893 Global Performance Clear. It is crazy expensive but my first gallon lasted 13 years and produced 26 airplanes! It is also not available in some metro areas (like where I live). If you can't buy it where you live or simply can't deal with the price, find a good auto paint store in your area and tell them you want a good quality clear that is primarily used for refinishing. The result has been 18 to 20 points under some very critical judging and serious competition.
Here's the process:
Sand all bare wood with 320 paper. You might be tempted to use a vacuum to remove all the dust. Do not do that. Wipe the surface lightly with a paper towel followed by a tack cloth again applying very light pressure. This will not remove all the dust but will spread it evenly. The even coat of dust will actually aid in filling the grain. Brush on 2 coats of KBS Diamond Finish Clear sanding lightly between coats. This will permanently seal the wood. When dry it will be quite rough to the touch. Sand very lightly with 400# dry. Now brush on an unthinned coat of Brodak or Randolph clear. Next cover with Japanese tissue or silkspan. Use the same Brodak or Randolph clear thinned about 60% to adhere the covering material. Next brush on 2 more coats of unthinned clear and let dry at least 48 hours, a week would be better. Now you have a good base but it will be rough and even a bit lumpy. It's time to sand. It will be a tough sanding because the dope will be hard. Tough it out! Sand thoroughly with 220 paper. The goal is to even out the clear but not sand thru it. The best technique here is to apply medium pressure and move in a circular motion. Take your time, it's not a race. When you're finished sanding you will have a fairly smooth surface with a lot of low spots and deep scratches. You can see the low spots by the little shiny spots when held in normal room lighting. Don't worry about the scratches; in fact they will be good teeth for the next step.
Pour some full strength clear in a large container with a good sealing lid. Now dump in as much talc as will stay suspended in the dope and stir thoroughly. Wait 10 minutes for the talc to settle. If it stays suspended, add more talc until some finally settles. Next, very important step is to mix in a small amount of black dope, just enough to give the mixture a very light gray tint. This tint will help you see how the low spots have filled during sanding. You can find good quality talc reasonably priced at this website soapgoods.com. Thin this mixture only enough to get it through your spray gun. I use a big ugly spray gun with a cup on the bottom. They're inexpensive and readily available at just about any hardware store. Spray on a heavy coat of this stuff and don't worry about runs or drips. Let it dry 24 to 48 hours.
Now here's the really cool part. You're going to sand off 90 to 95% of this filler and you'll hardly break a sweat. This stuff powders like crazy and is very easy to sand. Since this filler is gray after sanding you will be able easily see the remaining low spots and areas that need more filler. There is no need to get out the spray gun again, just use a brush to spot fill and sand. Once everything is uniform you will have little spots of the gray filler all over.
The final step in preparation for color is very important and will help prevent your base coat from coming off when you remove the masking tape. Clean the entire airplane with Original Windex at least two times. Thin some clear dope 80% and spray on a quick wet coat. The purpose is to lock down everything before color. Don't sand this coat of clear. Do not skip this last thin coat of clear or you could have a mess when you remove the masking tape during the trim.
The next step is to spray on a blocker coat to have a consistent base tone for final colors. It has been customary to use gray or silver for this. Generally, silver has adhesion problems and has grown out of favor. If you use gray make sure you add a lot of white. What you're looking for is only a very light gray tint. Medium to dark gray will cause subsequent coats of color to be dull and will require more paint to cover. Just mix a small amount of black into white. The lighter the better. Of course if your base color is going to be gray or black it doesn't matter.
Color:
Your preference of dope or automotive basecoat color. Be sure to thin enough to go on smoothly with good adherence. That usually means thinning more than recommended by the manufacturer. Spray on just enough color to cover evenly; don't worry about shine or blushing. Once all colors are on. Spray on two coats of clear dope thinned 60 to 70%. Again don't worry about shine or blush. Very lightly sand everything with 1500# wet. The best solution for wet sanding is plain warm tap water, with a 3 drops of dish detergent mixed into a pint. Be careful not to sand through the clear coats. In this sanding you only want to lightly scratch the clear randomly. Once everything is sanded clean everything with Original Windex. CLEAN IT AT LEAST 2 TIMES USING WINDEX. I usually do this procedure four times. Degreasers such as Prepsol, AcryliClean or Sikkins don't get the job done here and they might actually cause problems with the final clear coat. What you really want to do with this cleaning is remove everything that is not fixed permanently to the surface. The reason for all the cleaning is just about all of the dust particles, dirt and oils that end up in the final clear coat are on the plane before you spray clear. Very little comes from the air. Once you have cleaned and re-cleaned go over everything with a tack cloth several times being careful to apply only light pressure. My preference for tack rags is "Surgical Blue" brand found at auto paint stores.
Now you're ready for the main event. Apply one coat of automotive clear. I use PPG Global Performance System Clear D893 and D871 Medium thinner/reducer. PPG is a 3-part paint, clear, catalyst and reducer/thinner. I use 50% reducer to get very thin mixture. I also use a gravity fed touch-up gun to put on a very light but even coat. The PPG will flow out perfectly and be dust free in about 10 minutes and the model can be handled in about 2 hours but let it dry for 24 hours. At this point your plane will shine like glass and depending on how much dust you didn't clean off before spraying you just might be finished! If there is dust fear not, the next two steps will produce a very shiny smooth finish. Wet sand with 1200 so that everything is almost dull with only a few low shiny spots. Spray on 2nd coat of the clear PPG. Let this final coat dry for at least 72 hours; a week is better. The final step is wet sand with either 1200 or 1500# using the water and soap solution and rub out with a fine grade of rubbing compound or just go fly it depending on your preference. This whole process will add 7 to 10oz. a large 750 sq. airplane. It only added 6 oz. to my latest Diva (Miss Attitude).
Good luck and remember: Rely on the fact that something is working to validate the fact that it does work.
Back to Aerobatics page
Flying Lines home page
This page was upated April 18, 2014