![]()
Miscellaneous Stuff
Adventures in model finishing
using 1.5 mil laminating film

Two Vintage Combat models built by Bob Mears and covered with 1.5 mil laminating film. Bob Mears photo.
By Gene Pape
March 2021
Bob Mears got me started with 1.5 mil laminating film when I noticed the finish on some of his Vintage Combat models that appeared to be covered with silkspan but upon careful examination obviously weren’t. I inquired with Bob as to what the models were covered with and he told me that they were covered with 1.5 mil laminating film with a mist coat of white spray primer on the adhesive side.
I reported on this in my first column of November 2015. Since then, I have continued to learn from Bob, who I consider to be the established guru of using laminating film for model airplane covering. Those pictured above are the two models that caught my eye. In addition to the laminating film covering, these models are trimmed by scuffing the areas to be trimmed then spraying on Rustoleum color and a polyurethane clear coat for fuel proofing. These two models got me started on a path that has gone in directions I never would have expected. If you belong to Facebook You can see his museum.
Material
The first thing I needed was laminating film. I started with a Google search. I spent several hours looking at various sites and finally came up with a 15” wide roll of film 500’ long for about $25.00. Since then, I have discovered there are many sources for this film. The easiest way to get it is to go to this Amazon page and buy a roll that will last the rest of your life. The cheapest way is to scrounge local printing shops until you find one that will give you ends of rolls for free.
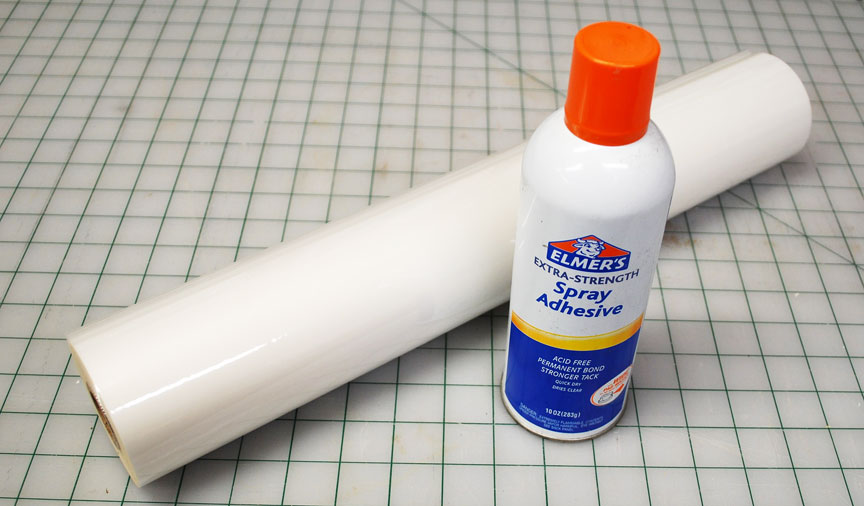
Laminating film and spray adhesive. Gene Pape photo.
Some history
While using laminating film seems new to most of us, it’s been around for a long time. I first remember reading about it in one of the model magazines in the early 1960s. I was only around 13 years old at the time. Finding a source for and buying a roll of material at the time was beyond anything I could hope to do. The trade name Doculam stuck in my brain since then until I finally started looking for laminating film. That trade name is still around.
How I started
The first model I covered with this material was a Voodoo, which I wanted to look like the model on the kit box and be powered by the same engine as my first Combat model, a K&B Green Head .29.
The Voodoo, powered by the Green Head .29. Gene Pape photo.
This model was covered with the laminating film with the previously mentioned light coat of Rustoleum white primer sprayed on the adhesive side. I used a relatively low setting on the iron to attach the covering. I then trimmed it using black low-temp Top Flite Econokote. The model came out looking quite nice and would teach me a lesson. After a few flights, the covering started to come off. Because the adhesive had been compromised, I used contact cement to stick it back on. When I conferred with Bob, I learned that you must use high temperature on your iron to adhere the covering to the model structure. Since I learned this, I have had no further problems with the laminating film coming off of stick models.
Laminating film on foam Combat models
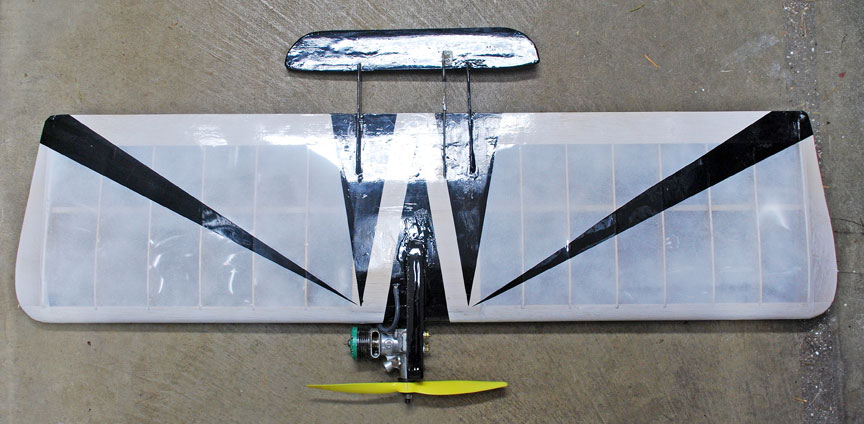
My next adventure was covering foam-wing Combat models. I jumped right in and built five of them using the laminating film for covering. I again used my-low temperature iron setting needed to cover foam models. Since I had not yet had my learning experience with the laminating film coming off of my Voodoo, I didn’t expect any problems.
An Underdog covered with laminating film, which turned out to be a learning experience. Gene Pape photo.
I just love to learn from mistakes! I jump right in and make them all the time. This turned out to be some rather large ones. Of course, the film started to come off at the center of the model. Worse yet, the models flew terrible! This was because the film was not properly adhering to the foam. I started by Band-aiding the problem using strapping tape to stiffen the inboard wing.
I make my bladder compartments by simply cutting a slot in the foam and covering it with film. I was really loving this since the laminating film has no sticky adhesive like FasCal I wouldn’t have to do anything to prevent the bladder from sticking to the film. What I hadn’t counted on was that while FasCal with something inside to prevent the bladder from sticking to it was easily strong enough to hold the bladder, the laminating film wasn’t. This allowed the bladder to exit the model during maneuvers. I contacted Bob again and found out that when covering foam with laminating film you need to spray a light coat of foam-safe spray adhesive on the foam before covering. I uncovered one of the models and re-covered it using this method. Problem solved. The bladder compartment weakness was solved by using a piece of clear packing tape over the bladder compartment before covering the model with laminating film.
More on wooden models
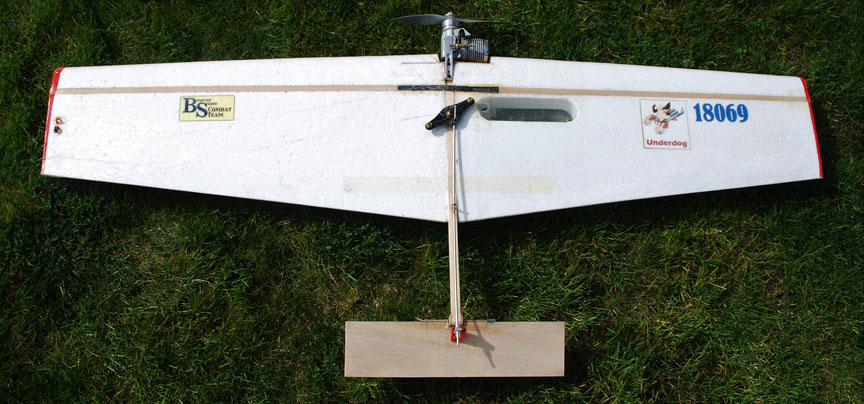
After sorting out how to use laminating film on foam Combat models, I built more Vintage models using my technique of using the white primer spray to simulate silkspan and trimming with Econokote. The next learning curve came when I was given a previously beautiful red silk-covered Sneeker built by a friend in the early 1960s. The red silk had many holes in it and had gotten so brittle I couldn’t salvage it. Since I no longer have any willingness to finish models with dope, I had to come up with another plan. I remembered that Bob Mears sometimes uses translucent RC car paint on the adhesive side of laminating film to simulate translucent film covering. With that in mind I thought, why not try a thin coat of red Rustoleum spray on the adhesive side of laminating film to simulate the red silk? It worked out beyond my expectations.
The refinished Sneeker with Rustoleum spray paint on the adhesive side of the laminating film. Gene Pape photo.
The next model I built was a Half Fast III for Vintage Combat. On that model I wanted to try to simulate colored tissue. This time I used a mist coat of red Rustoluem spray on the adhesive side of the film. Again, success.
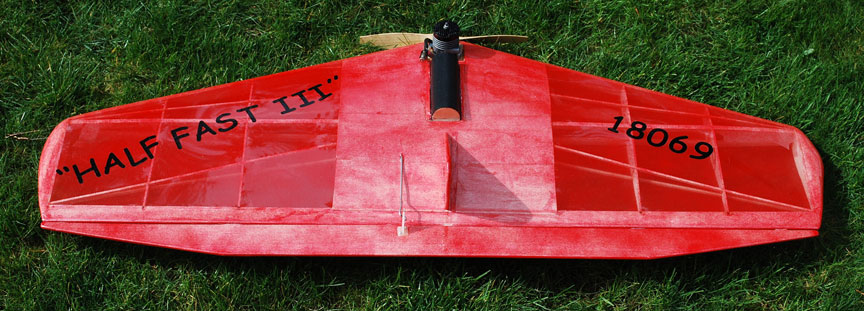
The Half Fast III, again with Rustoleum on the inside. Gene Pape photo.
1.5 mil laminating film over tissue
About a year ago I started noticing on the British Combat Facebook pages that people were talking about covering models with mylar then covering the mylar with tissue and dope, which is apparently an allowed finish for one of their Vintage Combat events. The comments more and more became complaining about what a pain that procedure was. A few months ago, I began to wonder why they didn’t do it the other way around to save having to deal with the dope finish. When I asked if the rules stated that the tissue and dope had to go on the outside to satisfy the rules the responses were all that putting the mylar on the outside wouldn’t work. Since my body won’t allow me to use dope, I decided to try it anyway.
The first model I used this method on was one of the easiest possible to cover. A vintage T-Square. I wanted it to look it was covered with silkspan and finished with clear dope. While I have real silkspan and it would probably have worked better, I had a ton of exam table paper and decided to use that. Once the frame was sanded, I put a coat of white glue thinned 50/50 with water on the area where the tissue would be attached. Once it dried, I scuff sanded it. I then use an iron to attach the tissue dry to the structure. I then put another coat of thinned white glue over the area where the tissue attached to the structure. When that was dry, I sprayed water on the tissue to shrink it. Once it had dried wrinkle free, I added the decorations. Then I simply Ironed 1.5 mill laminating film on the entire model. Using a high temperature setting on your iron the laminating film sticks to everything including the tissue.
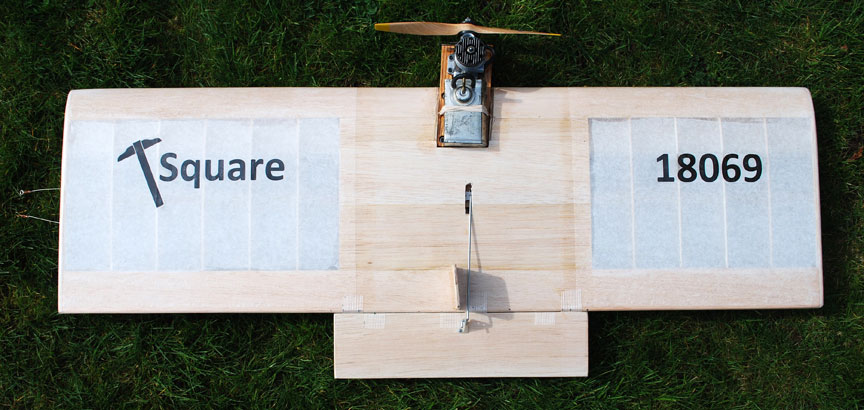
The T-Square covered with laminating film over laminating table paper. Gene Pape photo.
Since this turned out well, I sent a picture of the model to British flyer Tim Hobbins. He was impressed, but he told me the order of the mylar and tissue is specified in the rules. He assumed that if he did it a huge uproar would ensue, so he is planning to do a test model and present the idea at the next meeting of those who create the rules. Meanwhile, I thought I would present the idea here so others who build models to look reasonably nice could do so without the mess of painting or the expense of colored film coverings.
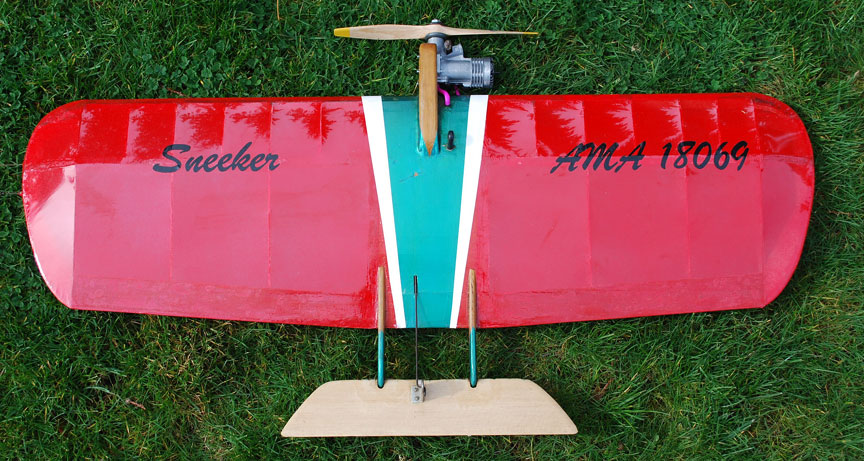
I wanted to try something a bit more complex, so I built up a Sneeker Vintage Combat model. The Sneeker has rounded wing tips and I wanted to try some colored trim. Since the exam table paper doesn’t shrink as well as other coverings, there were some wrinkles left in the tissue. This shouldn’t be a problem if you use silkspan or any number of other types of tissue that shrink more.
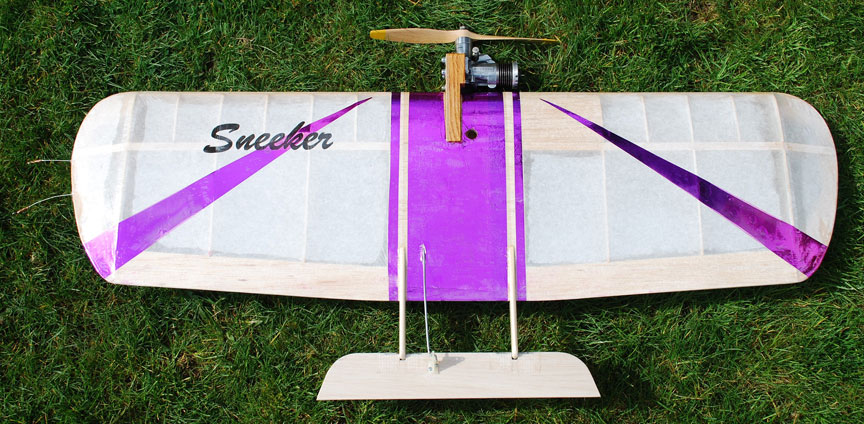
The Sneeker with laminating film over exam table paper, wth mylar gift wrap trim. Gene Pape photo.
I had some purple mylar gift wrap lurking in my stash that I have been wanting to use on something for some time. I applied it directly to the bare tissue and wood using a mist coat of spray adhesive on the back side of the pieces I had cut out to use to trim the model. I then covered the entire model with laminating film. I was careful not to use the high temperature setting on the iron over the trim until I was certain the laminating film was sealed down as well as possible using a medium setting. The results, while not perfect, are quite pleasing.
Thanks for the help
Special thanks have to go to Bob Mears. Without his help I would never have been able to even get started with this. In addition to the help with the laminating film, he is the one who has kept the Control Line Plans website going so we have plans available for tons of Combat and other control-line models.
Things to try
I hope this gives at least someone out there the encouragement to try 1.5 mil laminating film to finish models. The applications seem endless to me. Models can be decorated with colored tissue then covered over with film. It would likely be a good idea to use some kind of clear water-based finish on the tissue before covering with the laminating film. I tend to start out the easiest way and work toward the best. Also, I think it would work well to do a minimum-prep colored paint finish over tissue then cover the entire model with laminating film for the equivalent of many coats of clear over the top. The kinds of paint you can use are now endless as the laminating film will absolutely fuelproof the whole thing. Simple models like the Fury from Control Line Plans would be easy projects to play with. You can be like me and make lots of mistakes to learn from. You may be rewarded with an odor-free method of finishing models. Let me know how it goes.
Back to Miscellaneous Stuff main page
Back to Regular Columns
Back to Combat section
Flying Lines home page
This page was upated March 18, 2021