
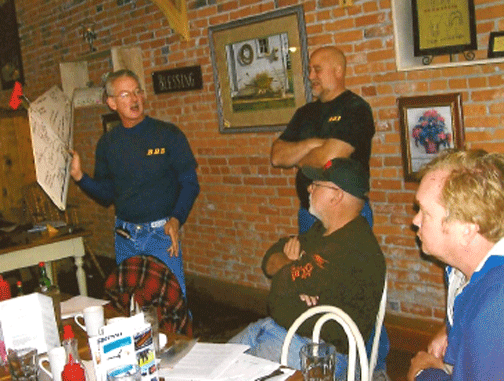
Jeff Rein discusses use of the Bod Busters' R&B Ripp-Off airframe in Northwest 80mph combat at the clinic held in Chehalis, Wash., on Oct. 18, 2008. Broadway Bod Busters photo.
Yes Folks, it's true.
On October 18th in the sleepy little town of Chehalis Washington, we held the first ever high performance speed limit combat clinic.
 LET'S EAT!!!
First things first, ya know. The venue was a restaurant called Sweet Inspirations owned by John and Patty Harris. A renovated brick warehouse with old world counter and signs which give it a charming and friendly atmosphere. The breakfast was great and while having tried his most favorite dish in the world (eggs Benedict) The Rein Man has endorsed theirs as the best he's ever had.
One-time Broadway Bod Buster Press Secretary Heuvos Fritos, (currently on retainer) has searched the Chehalis area for just the right establishment to call "home base." We have found it in Sweet Inspirations, John and Patty have pledged support in creating a lunch special for the Chehalis Cup fliers. Sweet Inspirations is about a mile or so from the flying site, with lots of room for all of us. They had made a row of tables for 20 with much more room to spare. We were able to have our clinic presentation complete with visual aids and not disturb the other customers.
Jeff and I tag-teamed the information presented. I introduced the topics,
what we intended to accomplish along with a small background on why we were
doing this.  The tag went to Jeff who explained in detail, the construction techniques used for building our R&B
Rip-off. Critical points were drawn on the actual airplane for a visual
aid (right). As they were talked about I could point to the exact spot for
clarity.
 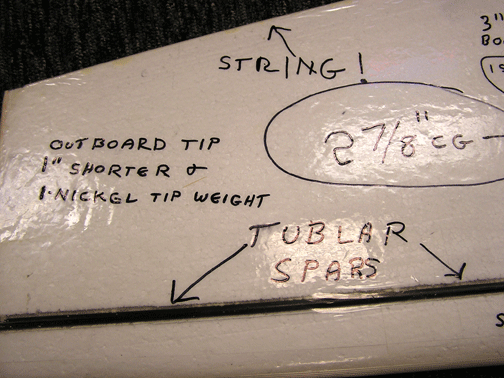 Trimming the flying was emphasized
and key points of using this platform were covered. Key points of converting
an RTF F2D wing were also covered.
CG's, leadout rake, shutoff mounting, were all made clear with handouts to the group.
A copy of both tip and root airfoils for the R&B were also supplied for those who wanted to make their own. We concluded and adjourned to the flying site to let those who wanted to, test fly our equipment.
Most flew conservative as you might imagine. However, it was Gary Harris who really put the R&B through its paces. Gary took it upwind and wrung the heck out of it, turning very tight inside loops, outside loops, figure eights, shake and bake moves. Remember, this wing has the H&R shut-off so as with any shutoff going up wind and turning tight will produce the least amount of line pull. The shut-off never false triggered or sagged the engine run at all.
Later we switched to the RTF's which flew well. I think there is more interest in buying these days than building so we used a Wakkerman and typical F2D triangle style.
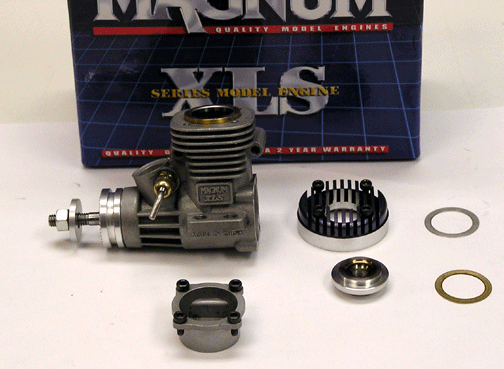 The low-cost engine is another story, I'm sad to say.
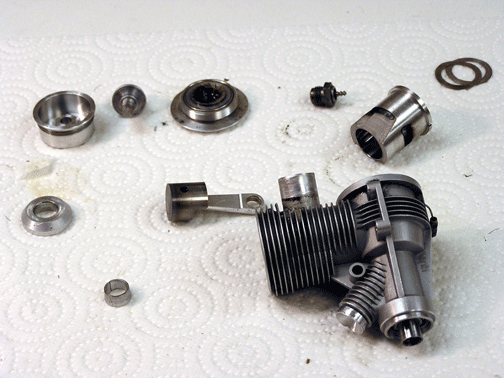
I had tried to get a Magnum .15 xls (top right) to consistently run 80+
mph. Stock, it would be perfect for 75 mph. The best it ran stock was 79.2
mph, but with a little head work from Henry, it sang like a bird around
85 mph!
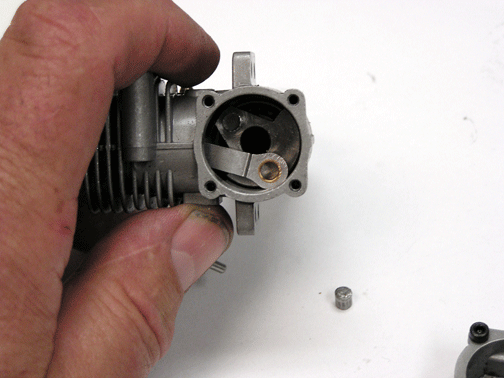
 It, however, choked on birdseed and sheared off the crank pin (bottom
right) making that noise we all remember from the days of flying Foxes.
For the sake of getting it done, I'll go out on a limb and say that the
MVVS .15 will do the job here. It's heavier than I would like but has a
base line RPM of 26,000 while the Magnum has a "useable RPM rating"
of 18,000. We are going to have to notch the MVVS into the wing aka old
fast ships because of the weight but the wing will float it just fine.
The MVVS can be purchased from Hobby Club for $59.95. The engine, however, is an RC version so check out Tower Hobbies for low-cost NVA assemblies. They have several for $10.00 or less.
The Hobby Club was easy to do business with and the engine arrived in two days.
(I will complete the testing on the MVVS this week and publish the results on Flying Lines).
 The clinic flying portion was conducted using
PC6, and PC1, both Cyclon, the PC1 was the most fun.
We didn't think it had the power so bored out the venturi to .250. Big-o mistake-o!
We were rewarded with a 92 mph run (Alex makes nice engines!)
A little fixum was added to it and reduced the venturi just a click larger than its stock 4mm size, this produced 84 mp. Putting the muffler back on to the happy-to-please motor took it right into the 80-81 mph zone.
I have included Jeff Rein's article for further reading along with some pictures for fun.
A special note of thanks to Jeff Rein for all of the work he put in on this idea.
-- Kenny B and The Bod Busters
The current design has the following features that we find helpful for the demands of 80 mph.
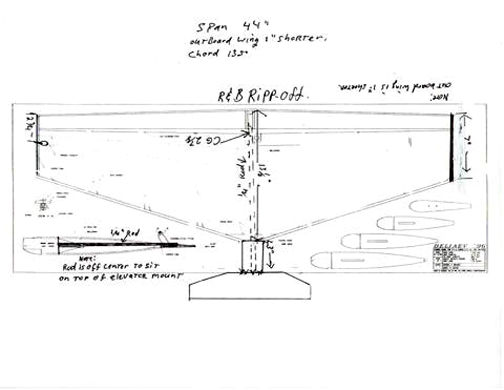 The F2D and fast versions are different.
Airfoil: 1993 Baliev
Spars: 1/4" fiberglass kite tubes that can be located online for $1.00 or less each.
Elevator: Coreplast, sewn on to stabilizer platform.
Center boom: 1/4" fiberglass kite tube offset to exit wing on top of the stabilizer platform for strength.
Motor block: Drilled for cf tubes for engine bearer bolts, use CA to hold in block.
Glue: WHITE (new) Gorilla glue for all joints except engine block to spars. (Use good epoxy.)
Brace: Poplar (Home Depot); put deep nail holes in foam where foam is glued to motor block (both sides) running span-wise. Squeeze GG into holes then assemble with GG on the foam to block areas.
Truss: Holes: Use a nail to poke holes beneath the wing spars (through thickness) force GG into them Attach spars using GG and epoxy for spar to motor block.
CG 2-7/8" as measured straight back from the centerline.
Line exit: 2-3/4" back from tip l.e. (note visual aid shows 1-3/4"; that is an error)
 Span: 44" with outboard wing 1" shorter.
Engine notch: Foam notched for engine block on outboard side of foam only, the block should be flush when set in notch.
String: On T.E glued to T.E and balsawood wingtips. (Wrap around boom and CA in place.)
Covering: SLC covering (Core House)
The above are features we have incorporated for use with .15 engines on 60-foot .015 lines.
An ideal engine for this is Cyclon PC1-6 series. 10% nitro, APC 7 x 3 prop or cut down 7 x 4 prop.
F2D props work well also but may increase the speed over 80.
-- KB
By Jeff Rein
Our goal, with this clinic and the upcoming Chehalis Cup next year is
to bring 80 mph combat to a new level of performance at a low cost. This
can be achieved with inexpensive APC 7-3 props, 10% fuel, and airplanes
that are simple to build. You can use any design you wish, but today we
are mostly 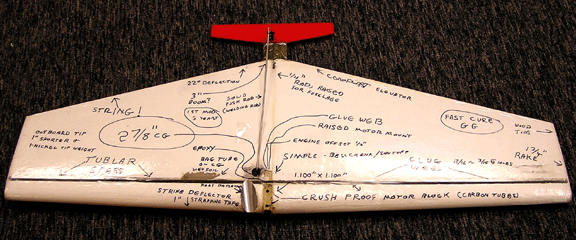 focusing on what we have found to be a very
successful combination. Ken and I have no secrets here. We are sharing everything
with you that we have learned through experience and traveling to contests
across the country. Our plane (right) is called the Ripp-off because just
about all aspects of the plane design were the best ideas from a host of
equipment and building techniques that we have seen over the last 10 years.
Trimming, Trimming, Trimming:
Absolutely the most important thing you can do for any aircraft you choose to fly in competition is trimming. Trouble free shutoff's, turning ability, no stalling, user friendly flight characteristics all rely on proper trimming. The following procedure is a detailed description of how to accomplish this and MUST be done in this order so as not to give invalid feedback when corrections are made.
1. Start by putting up a one-minute flight. Fly level and observe the wing. Then fly inverted and observe the wing. It should look identical. If the outboard tip flies tip up or tip down, stop there and do not proceed to step two until the wing flies level. If it cannot be corrected at the field, write a note on the plane with a sharpie and bring it back to your shop to correct the warp. When the plane is corrected, move on to Step 2.
2. C/G is critical. The plane should not hunt, and yet be able to turn tight, consecutive loops, inside and out without stalling or jumping in with the use of 15-25 degrees of elevator deflection. Once the proper C/G is found for the particular airframe you are using, adjust all of your planes C/G identical at home in the shop using a balancing tool. I will explain this later.
3. Leadout rake is CRITICAL. If your wing is straight, and your C/G is correct, the last thing that needs to be adjusted is leadout rake, and tip weight. Make consecutive loops, and move the leadout rake back until 5 pounds of tension is maintained. Too far back, and the outboard wing will drop causing the plane to stall. Too far forward and the plane will jump in and trip the shutoff. Be consistent. Pick a proven good platform i.e. R&B Ripp-off, Granderdog, or any modern RTF.
Here is what I do before my plane leaves the shop:
1. The R&B Ripp-off uses a 1993 Beliaev airfoil with a 1/2-" leading edge taper. The C/G is Exactly 2-7/8". 2-3/4" is too doggy, and 3" is too hyper.
2. At the motor mount, I measure back 2-7/8" from the leading edge, and make a mark. I draw a 12" line, parallel with the spar at that point. Then place the plane on the balancing tool exactly on the line that was drawn. (two vertical 2" dowels mounted in a horizontal base makes a good balancing tool). Adjust the C/G by either moving the motor forward or back, or by taping a nickel or a quarter near the tail.
3. Check for warps! I build AND cover my planes in a foam cradle made from old foam jackets. If you shrink your covering tight without being in the cradle or a jig, you probably will induce a warp. After covering, recheck the plane in the cradle. It is easy to detect a warp in this manner. For RTF planes, pick a flat surface, and suspend the plane on wood blocks at each tip and one near the tail. Take a ruler and measure for consistent height along the entire trailing edge. Correct any warps.
4. The leadout rake for the R&B is 2-3/4" measured at the tip.
5. The elevator deflection is approximately 22 degrees up and down.
6. The bag tube is located at the C/G so the balance does not change during flight.
7. The motor is mounted 1/4" outboard of the center, and the outboard wing is 1" shorter than the inboard with a nickel for tip weight.
8. Other important items are balsa tips, string along the trailing edge, crush-proof motor block, and Phil's SLC covering.(Core House) All of these construction techniques make for a very durable high performance combat plane.
Note: All of these measurements are constants that took years to figure out and never change from plane to plane. This is why I fly the same design all of the time. By using the same formula, it is easy to duplicate. Norm McFadden was the best example of this technique resulting with much success.
Construction:
1. I design my planes to be strong, light, cheap, and build as simply and quickly as possible. If you decide you want to build using my cores, I will sell them to you with just the airfoil hotwired, or completely routed and ready to assemble, which ever you choose. I will give you a copy of my airfoil so you can cut your own cores if you wish. If you want to fly an RTF plane, the conversion is easy. Simply cut off the leadouts, remove the bellcrank if you wish, and add a leadout guide approximately 3/4"" aft of the stock leadout position. Mount the H&R identically as in the R&B Ripp-off. Then follow the trimming instructions mentioned previously. The entire conversion takes less than 5 minutes.
2. I build my entire plane with the new fast cure Gorilla Glue, except where the spars join with the motor block, where I use epoxy.
3. I use a nail to poke 5 horizontal holes in the foam where the wing joins to the motor block and squirt glue in them to make a reinforced bond. I also poke 4 vertical holes in the inboard and outboard wings between the upper and lower spars and squirt glue in them. The glue gives it an I beam effect, which makes the wing very stiff.
4. Other important items are balsa tips, string along the trailing edge, crush proof motor block, and Phil's SLC covering. All of these construction techniques make for a very durable high performance combat plane. (The motor block has vertical cf tubes for glued in place the through bolts)
 Motors for 80 mph
We love our Cyclon PC6 motors, but they are hard to find.
Just about any obsolete F2D motor i.e. Fora, Redco, or other Cyclons will work if you can find someone to sell you one. (Photo at right shows Cyclon PC1).
In the meantime, we were working on coming up with an inexpensive substitute. We want to stick with the .15 so we can use .015" lines. The Magnum .15 with a Nelson head button looked promising but was deemed substandard when the crank blew somewhere around 82. We can put the word out on combat-l that we are looking for obsolete motors and may be able to pick up some in Arizona next month if you wish.
Conclusion
If we all have top notch, high performance and reliable equipment, we will all get more actual combat time and all of our skills will improve. It is a win-win situation for all!
This page was upated Oct. 22, 2008