![]()

Yes Folks, it's true.
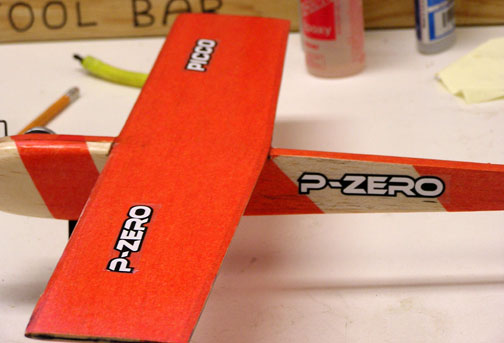
The name, Picco De Gallo's was inspired by Steve-O of the BBB during one of our impromptu meetings at winter H-Q (Gators) Meanwhile, the converted Picco .8cc to .050 has found a shiny new home to roost in.
See article on converting the Picco .088 to .050.
Construction of the Picco de Gallo is straight forward and would present no issues to a new modeler, or an experienced one wanting to try out 1/2A Proto. With all the new super .049's available now, why not! There are no drawings of the airplane, it's as simple as it looks and recent attempts by me to make them turn out to be nothing short of stick men.
 Stabilizer: 1/8" hard balsa, 40% of wing area
or about 20 sq inches.
Stabilizer: 1/8" hard balsa, 40% of wing area
or about 20 sq inches.
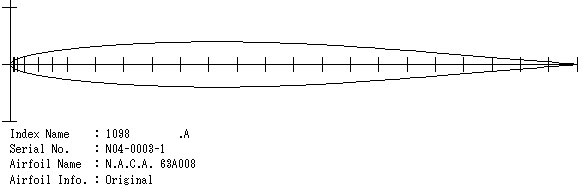
 Sand the wing to as close to a NACA 63-008
shape as is possible with such thin wood. I use a pen and mark a centerline
on the thickness of the wing, all the way around the le, te, and wingtips.
I sand to this line but not through it. The same applies to the even thinner
stabilizer, take some time and do a nice job. To help with wing alignment,
I tape off the bottom where wing meets fuselage so as to leave it square.
Once glued in, it can be sanded out to fair in and all edges pointed. The
same applies to the stabilizer.
Sand the wing to as close to a NACA 63-008
shape as is possible with such thin wood. I use a pen and mark a centerline
on the thickness of the wing, all the way around the le, te, and wingtips.
I sand to this line but not through it. The same applies to the even thinner
stabilizer, take some time and do a nice job. To help with wing alignment,
I tape off the bottom where wing meets fuselage so as to leave it square.
Once glued in, it can be sanded out to fair in and all edges pointed. The
same applies to the stabilizer.
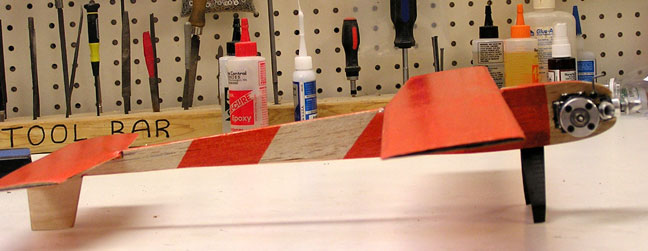
The model has a subrudder that is slotted through the height of the fuselage; this method makes a very strong back end without adding additional weight with the added bonus of your tail skid not breaking off on a less than desirable landing.
Stabilizer to fuselage, wing to fuselage, motor mounts and nacelle were epoxied in place, all else was thin CA.
Nitrate/butyrate dope. Apply 3coats of thinned nitrate, light sanding between coats. Cover with colored polyspan, apply 4 coats of thinned nitrate, top coat with butyrate to fuel proof or spray with epoxy. For those obsessed with light weight, try sealing the bare wood with hair spray before applying the tissue.
Bladder system.
This proto style is referred to as a top wing, it affords only one advantage and that is room for a fuel tank on the profile fuselage. Notice that there is no tube to hold the bladder, this is an old combat trick used by innovator Ed Brzys of Detroit, he would mount the "bag" on top of his wing running it chord wise down the center rib/boom on his ultra light combat wings. The only trick is to be sure it stretches between anchor points, about 50% when empty to allow for expansion as it fills. The shape of the filled bladder is more aerodynamic than some tube you might put on the model to hold it. I choose a bladder system because to me, it's simpler than a tin tank, especially on a profile. Fill the tank, pinch the fuel line, prime the engine and when it fires.let go of the fuel line.
Because of the extra weight of the Picco, you will want to adjust moments if you use a lighter engine such as Fora, Cyclon or Profi, just be sure the CG is at the 20%-30% point of the wing chord behind the leading edge, doing loops and wing-overs in the speed circle is frowned on.
 Force yourself to use what may seem to be
the overly large stabilizer, this is what helps the model fly well and presents
no additional drag of consequence. A proto wants to take off as smooth as
a stunter and not hop into the air, it should fly without hunting up and
down. Design your control deflection to10 -15 degrees up and down, this
should work well on a properly trimmed model. Line spacing at the handle
should be 2" or less to assist in smooth take off's and flying, you
will likely need to fabricate or modify an existing handle to accomplish
this. Avoid using heavy adjustable wire to connect your handle to lines,
they can pull kink and twist, causing lack of control until the model begins
to pull and by then it's too late. A better method for the light weight
1/2A is to have no flexible wires and attach the lines directly to the handle.(yes,
this means you'll have to cut your lines precisely)
Force yourself to use what may seem to be
the overly large stabilizer, this is what helps the model fly well and presents
no additional drag of consequence. A proto wants to take off as smooth as
a stunter and not hop into the air, it should fly without hunting up and
down. Design your control deflection to10 -15 degrees up and down, this
should work well on a properly trimmed model. Line spacing at the handle
should be 2" or less to assist in smooth take off's and flying, you
will likely need to fabricate or modify an existing handle to accomplish
this. Avoid using heavy adjustable wire to connect your handle to lines,
they can pull kink and twist, causing lack of control until the model begins
to pull and by then it's too late. A better method for the light weight
1/2A is to have no flexible wires and attach the lines directly to the handle.(yes,
this means you'll have to cut your lines precisely)
The canopy (not shown) will be cut from a thin piece of clear plastic and glued to the fuselage just behind the T.E of the wing.
The Picco has close spacing of the mounting holes so be mindful to get the engine beams as close as possible. I used bars that were drilled and tapped to form the mounting nuts, they run vertical and are inside the cheek cowl. I bought them at the hobby shop and they are Dubro steel straps. Once I got them drilled and tapped, I mounted the engine and glued them into place with the engine bolted on, then epoxied the cheek cowl in place. Be sure to put Vaseline on the bolts. If I was to do it again, I would but the straps in place and solder nuts on it just for the extra beef. I have one that may be stripping and I use lock-tite there.
The CG can move back a bit more than the 20% chord point, but not more than 33%.
The wheel attachments are a pain but I used 2-56 blind nuts with the points flattened down. I filed the length of the blind nut down to the thickness of the Carbon gear, 2-56 bolt would then tighten on to the landing gear and form the axle. Use JB Weld and tighten the bolt to the gear putting a #2 washer under the head of the bolt. The wheels come with a bushing in them that is too small for a 2-56 bolt so it will need to be replaced with a larger one.
The Picco de Gallo flew great out of the box. The take off is smooth and gradual giving it every chance to put a good time on the board. The groove seems to be about 6-8 feet with no tendency to hunt. When the engine stops it glides and is controllable for a soft landing that will save the secret weapon prop you've been working on.
Good luck with your new speed plane, try every prop you can get your hands on.
Next time we'll modify a stock combat engine for this event and see just how fast they will go!
-- Ken Burdick
This page was upated Sept. 3, 2009