There just seems to be something that keeps the new carrier flyer from getting the most out of his 3-wire control system. There is some geometry, leverage, measurements, and then “the ability to make it all work” when it is your turn to leave the carrier deck behind. A couple of months ago I attended a carrier event and was happy to see two new carrier flyers there with a couple of very nice looking MO-1s. It turned out they were both carrier flyers from a while back, one had built a new plane for this contest and the other one had refurbished a plane from his former days in carrier flying. Both planes looked great and seemed to be set up and ready to fly.
From that point when it looked like nothing could stand in the way of these guy's returning to carrier competition things started to go downhill and both planes were partially rekitted by the end of the contest day. Both flyers said they had fun at the contest and had learned a lot and would be back in the near future with the same planes ready to go again. I sure hope these flyers do return to fly carrier again as the planes they brought to the contest were set up with all of the bells, whistles and buttons of a top AMA Profile Carrier plane and should be very competitive.
Both of these pilots said their planes were set up and ready to fly before they had arrived at the contest. As it turned out neither plane was ready to fly, they were close but close is not good enough when you get to a contest and especially if you are new or rusty at carrier flying. When I decided to get back into control line flying in the early 90s I found right away that I would be flying by myself 90% of the time. It turned out that this was a real plus in the long run as I was forced to find ways to do all the things that need to be done to arrive at a contest with a plane that is set up and ready to go. Most of us that show up at the contests do so with three or more planes to fly in competition and no one to help us other than getting a hand with the launch from the deck and help carrying the plane back to the pits after the flight. Any spare time we might have had is spent helping to time or judge with the ED while moving the contest along.
I found early on that trying to help someone set their plane up while competing in the contest was near to impossible do to pressure to fly, not being able to communicate because of noise, and not being able to understand each other because of differences in knowledge of the planes. So I'm going to share with you how I set up my lines or throws between the handle and the plane by myself in peace and quiet. I'm not going to tell you how to build your lines as that is a whole different tale.
I start out with a carrier plane that I have just “completed” building that is set up with a 3-wire control system made up of components that I know will work together (don't mix and match unless you know exactly what you are doing). I find an open space big enough to set the plane down and run the lines out in a straight line and connect the control handle. In my case it is usually my back yard but I have done this at school football fields, driveways, at contests in an out of the way place, parks, or whereever.
First thing I do is drive a 6” or 7” nail into the ground and attach a measuring tape to it and run it out to the length that I will be flying with. Then I set the plane down over the nail and run the lines out to the handle (be sure to clear the lines by running them out) and connect the lines to the handle. The lines should be color coded as to which is up and which is down leaving the throttle line neutral. If the handle (the part that you grip) falls somewhere between 60' and 60'-6” you have just passed the first big hurdle.
Now set the throttle to high speed (if you use push for HS you're there already and if you use pull for HS then you have to pull the throttle to the HS position and rubber band it so it stays in that position). Place the handle down flat on the ground in as neutral (up and down) a position as you can. Now take a couple more of the 6" or 7" nails and drive one inside the handle at the down position (bottom of the handle). At the up position (top of the handle) in the throttle area drive the other nail in keeping the handle in as neutral a position as you can. If you are using pull for HS the nail will go down through throttle finger hole in the HS position. With the plane facing in the HS direction (straight ahead), the handle in neutral, and the throttle set in HS I can now go to the plane to see how things are doing there.
I pick the plane up from a position in front of the wing. Be sure the prop is in a vertical position or better yet take the prop off of the engine before checking the throttle for the HS position. I then place my right hand in front of the wing on the inside of the fuselage and my left hand behind the wing on the inside of the fuselage. While putting around a 5 to 10 pound pull (you can pull harder if you want to) on the plane I check to see if the throttle is in the wide open position, the elevator is at or near neutral, and that all three lines have the same tension. If all three lines have the same tension or are very close to the same tension another hurdle is behind you (maybe). When they do not have the same tension the throttle line will be to tight or to loose and if so this needs to be corrected before you go any further. When I talk about slack it shouldn't be any more than an inch at most halfway between the handle and the airplane in the HS position. If the lines are slack and you leave them that way there will be an unbalance in pull on the lines which could be very dangerous.
Now is a good time to look at the throttle position on the engine when the control handle is in the completely closed position. Hopefully the rotor valve is in the closed position or against the idle set screw. If its not in this position and is still partially open you will need to shorten the arm on the rotor valve. If everything looks OK then its time to release the slider and check the throttle settings all over again to make sure you still can reach full throttle and then throttle back completely. If you find that in the slider released position (low speed) you have lost some of your throw with the rotor valve then you will have to work with the throws some more OR use the “device” described below that will make the throws the same when the slider is released or closed.
 Now look at the elevator again and make sure it is neutral or very close to it. If it is close enough to neutral another big hurdle has just been crossed again. If not then you will have to adjust the up and down lines with connectors until it is at neutral or close enough. Brodak has three different sizes of connectors and varying these should get you in the ball park, if not then you will have to do some work on the lines or leadouts if your plane is equipped with them (bummer). Or you could make a line connector that is longer with one of several tools that are on the market.
Well, has anyone said to themselves, “Why didn't he adjust the elevator first before the throttle“? For some reason I always wanted to know what the throttle was doing before I wanted to know what the elevator was doing. I suppose it doesn't make much difference which way you do it.
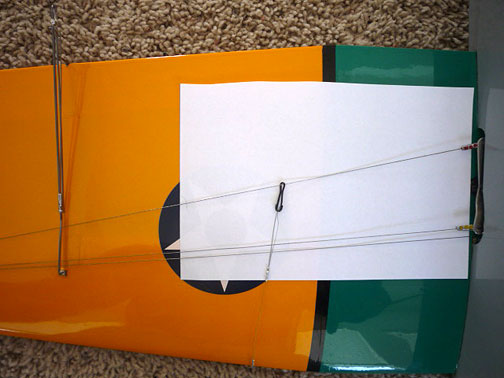
Now for you hard core line slider people I want to add something that will make your life much simpler out in the middle of the circle while you fly the low speed portion of the event. BB mentioned this “device” a couple months ago in the carrier forum and before that I had seen Pete Mazur using it on all of his slider equipped planes. After flying without this “device” for 10 years I finally broke down and tried it and now I would never fly with out it. I've included two pictures of the “device” or set up and it is pretty much self evident how it works.
If you don't have one of these on your slider-equipped carrier planes you have been flying the low speed portion of the event carrying a whole lot of down elevator or up elevator to keep the plane flying level while in the hang. Let's say that you did your line adjustments for throttle and elevator and when you got done adjusting for the high speed and all was well (throttle wide open, elevator level) you popped the line slider and turned the plane out of the circle. Suddenly you would see that the elevator had changed position (up or down) by at least 10 degrees. It's a real wake-up call when that happens while you are flying the plane especially the first time it happens and probably the next three or four times also.
This is where the “device” changes everything back to the way it should be. Looking at the picture where the lines are in the high speed position (slider not tripped) you will see a wire with a small connector on the end of it coming from the leading edge of the wing where it is attached. This wire is attached midway between the bell crank and the line slider. I run it off a small screw that I have installed in the leading edge of the wing. I drill a small hole cord wise in the leading edge, screw the screw in and back out, put a couple of drops of CA down the hole, let it set up for a while and then put the screw back in and it should hold OK as there is not much pull on it.
 I use .012 woven wire (.15 carrier control line) along with the smallest aluminum tubing crimped to hold the wire in place. The wire then goes back to where the small line connector is, loops through it and comes back out to a point “in front of" the other lines and is crimped in place with the small aluminum tubing. Be sure you do this crimp in front of the other lines (while in the high speed position) so they won't interfere with them after you trip the slider and while the lines are moving to the rear of the slider.
The way you can find the exact place that the rear line should be held at after the slider is tripped is: While the plane is sitting on the ground with the lines out and connected to the handle which is in the neutral position with throttle wide open, and the elevator is in neutral or level. Now trip the slider and rotate the nose of the plane out of the circle to the position you think it will be in during the low speed flight and look at the elevator which will now be up or down. Now while you are in front of the plane, pull the rear control line towards you and watch the elevator go to neutral. When it is at neutral, put a marker right at that point. Now swing the plane back to the high speed position and lock the lines back in the high speed position and see if the mark you made is a tiny bit behind the control line that will be run through the line connector. If it is slightly behind, your in good shape and you can adjust the .012 wire to hold the connector end and rear control line right where your dot is. If the dot is in front of the control line that will run through the connector you will need to adjust the connector further aft enough so the line will not be under tension while the plane is flying in high speed.
That should pretty much do it on a low wing plane with the lines on top of the wing. If the bellcrank and lines are on the bottom of the wing you will have to turn the plane over and lay it on the ground up side down and then do the same adjustments. When you are through you will find that you have full throttle control in the low speed position as well as when in the high speed position whether the slider is released or closed.
I don't know how clear this has been for you but it all works for me and should work for you. If you have problems with these instructions or things don't seem to be what you think they should be please e-mail me and I will help you get things worked out.
This page was upated March 15