Shop Tips
Building ideas from Northwest control-line modelers ...
Send your shop tip to the Flying Lines editor
-
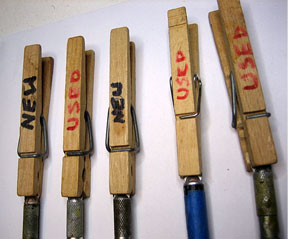 Knife identifiers: When I am building I will have multiple Xactos. The problem is keeping track of which one has a sharp blade. Clothespins solve the problem. Well almost, you have to remember where you put the clothespin when you take it off. >>
— Buzz Wilson 
<< Free clamps: Do you buy coffee in a bag at the grocery store? Save those little metal clamps — they work great! (Bend out the "teeth" with a pliers so they don't crush and distort balsa.) They also work great for pinching off fuel lines.
— Steve Lindstedt-
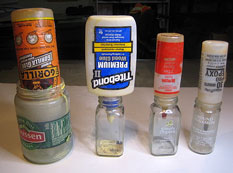 Good to the Last Drop: How many times have you taken a bottle of glue and shaken the hell out of it just to get the last drop out? Oh how I miss Ambroid glue -- you could get the last of the glue out and if you did not you did not care because it smelled good. I keep my shop around 55 degrees in the winter. This means the glue viscosity is high. For epoxy I use a hot plate with a pot of water and heat it to boiling and then set the bottles in the water. You have to monitor it closely or it will get too hot and when you mix the components it will set off too quickly. For all my other glues I use a jar and turn the bottles upside down. This is not just a winter thing, but year-round. Good old gravity keeps the glue ready to flow. It also makes it easy to find the bottles. >>
-- Buzz Wilson -
Storage box for engines: With the end of the flying season approaching, it is time to put away equipment for the season. For years, I have taken my Combat engines and put them into a plastic bag and stored them in a warm dry place. At the 2019 US F2D team trails Jeff Johnson showed me how he stores his F2D engines. They were stored in a container that he got from Harbor Freight. Jeff Rein and I thought it was a great idea. On the way back to our motel Jeff Googled Harbor Freight and to our surprise it was across the street from our motel. A quick stop and we had some new containers. Back home I used mine to store my competition F2D engines. Jeff used one for his F2D engines and one for his Big Blocks. I picked up three more from Harbor Freight to store more engines. The price is $4.99 each.
-- Buzz Wilson
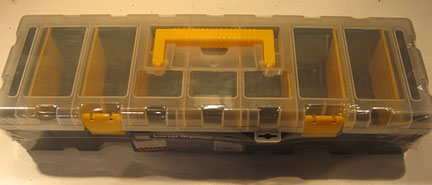
Left photo shows the part number and right photo shows the box. The dividers are adjustable. Buzz Wilson photos.


Left photo shows F2D engines; right photo shows 1/2-A engines.
-
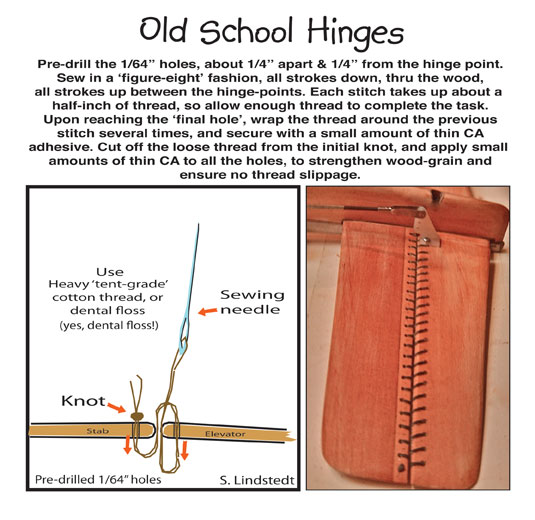 Sewing control surface hinges: Back in the Northwest Aeroliners days, Wayne Spears and Frank Macy both turned me on to this method. I'm certainly no expert, but I've found this to be an almost foolproof elevator hinge. I repaired my B Proto Speed plane with this technique when the metal hinge came apart, and am very confident it will last for years. >>
-- Steve Lindstedt
- Drill bit size chart: Befuddled by drill bit sizes? Check out this extensive Excel drill bit size chart.
-- Howard Shenton
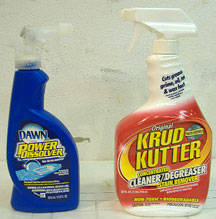 << Cut the crud: I like to keep my engines clean and running cooler. Some time ago I found a article in a model magazine about Dawn Power Dissolver for cleaning up engines and mufflers. I was interested because it was detergent based as opposed to all those industrial solvents which get to your liver, are abrasive to some metals and interfere with your sex life, if any. I found Dawn Power Dissolver at Walmart and it works great. It works best if you spray it on and let it soak 20-30 minutes, then scrub it off with a scrub brush. BUT they don't seem to carry it any more, in fact I can't find anybody who does, BUT I have found a substitute made by the Formula 401 people. It is called Krud Kutter and I found it in the paint section at Home Depot. It seems to be identical -- at least it works identically. By the way, if you need to repaint all or part of a greasy plane, there is nothing better to get them squeaky clean before starting to repaint.
-- Bob Lewis
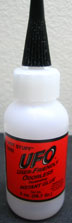
- Fast foam glue: In building Combat planes, foam-safe cyanoacrylate glue is a must. I have found one that works quite well. It is Hot Stuff UFO foam safe. If your local hobby shop does not have it, you can get it from Tower Hobbies. >>
--Buzz Wilson
- A handy item: One very handy item to have in the model shop is bamboo skewers! The model builder's secret weapon! I use them for everything from mixing glue and paint, using them for alignment pins, and pinning parts such as leading edges together through the fuselage, the stab/elevator assembly and even engine mounts. The bamboo will wick thin cyanoacrylate glue very easily into the joint, making it very strong. I have found this especially helpful with crash repairs. Next time you are in your local friendly neighborhood dollar store, look for bundles of bamboo skewers, and pick up a couple packs. That will be plenty for your model shop, and plenty for those awesome kebabs you make for your barbeque!
-- Snoopy
- Another sanding tool: Need a round tool to sand a radius, or any other concave round corner? Go to your local pet shop, find the shelf of bird accessories, and buy sandpaper perches, which come in a couple of sizes. Glue them onto a dowel for an easy handle.
-- John Thompson

 Covering trimming tool:
A simple tool to trim plastic covering can be made from scrap balsa. The depth of the trim is set by where you glue the guide block. To use the tool you have to hold the plane to keep it from moving. Take the guide and hold it in one hand and place the Xacto in the other. Hold the blade against the guide and slide along the work piece. >>
--Buzz Wilson
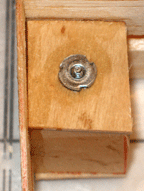
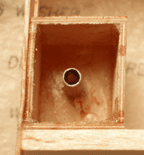
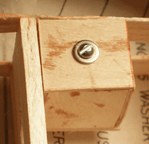
- Stay put tool:
Ever had your heating iron fall off the bench? Several years ago Dirty Dan told me about a tool he made to keep an iron from falling off the workbench. Here is one that I made. It is made from a piece of wood and a conduit clamp. First photos shows the assembly and two extra clamps. Second photo is a detail of the clamp holding the iron. The only other thing you need is a clamp to hold the assembly to the bench, shown in the third photo.
--Buzz Wilson
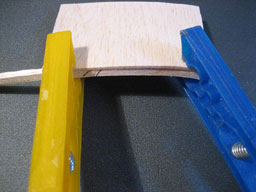 Gluing aid:
Ever have the problem of gluing a piece of planking against a vertical surface? Here is a simple trick. Make a false rib. Do not glue the false rib to the vertical surface. Glue the planking to the false rib. Then glue the assembly to the vertical surface. See photo at right.
--Buzz Wilson
- Tank tool:
The 18-inch brake is a great metal-bending tool for building CL tanks. It's available from Micro-Mark Tools. Just search for "brake."
– Buzz Wilson
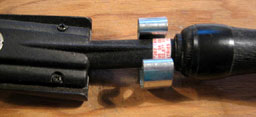
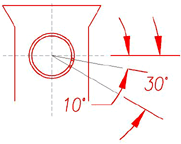 Spray bar positioning:
Experimentation has suggested that the best position for the hole in the spray bar is 'just out of sight." The idea is to put the spray hole in the lowest pressure area of the venturi for maximum fuel draw. Others have done some basic experimentation and found that 10° to 30° below the centerline, with that centerline being perpendicular to the venturi throat. See the basic sketch at right. Some Fox 35's had two spray bar holes, opposite each other, and about 10° below the centerline. If yours is one of these, then set the spraybar so that both holes just disappear.
– Dave Gardner
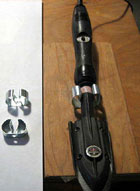
- Spinner repair:
Having recently aquired a "previously owned" aircraft powered by a SuperTigre .60, I noted that someone with more respect for their fingers than I had used an electric starter on the plastic spinner with ugly deep grooves as a result. Being frugal (cheap) and persistant (stubborn), I decided to attempt a repair of this older model DuBro single screw spinner. (Yeah, I know you have a "vintage" one I could have for $25. Remember to have your heirs put that on eBay someday!) Anyway, I found a paint spray can lid the same color as the spinner and cut thin strips of plastic from the lip. Using a pencil grip soldering iron, I melted the plastic "filler" into the grooves, trying to build up enough initially to ensure a complete fill. There is no need to try to get any kind of a finished looking surface at this point. I mounted the spinner in an electric drill using a longer screw with a nut inside the spinner tip, then used it like a lathe while smoothing the surface with progressively less course material and ending with pollishing compound. I was surprised by how tough the plastic is and found that you have to be very aggressive initially. I used a very course round file and a lot of pressure. This was fun to experiment with and the result is worth the effort and time, at least for the "frugal" set. Meanwhile, about that "world class" competition stunter you have available for only $300.00? Remember what I said about eBay!
– Mike Denlis
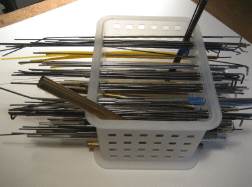
- Storing music wire and tubes have always been problem.
For years, I had a big tube with all the wire and tube inside. When it came time to get materials for a project, it became a game of pick-up sticks. When I built my new shop, I converted an old wine rack into a wire and tube storage system. This was a marginal solution with fewer pick-up sticks to deal with, but still a pain. I now have five storage systems for various materials and sizes.
1. If the short end will fit in a parts drawer labeled "wire and tube ends" it goes there.
2. If it is longer than the drawer, but is shorter than the small slot storage container it goes into the trash.

3. This (above) is where the short ends go that escape the trashcan.
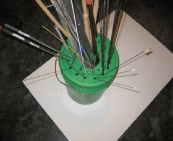
4.This (above) is for new materials. I took a plastic bucket and drilled holes for the small diameter materials. Next, I cut a hole in the center for dowels, aluminum angle, drill rod etc.
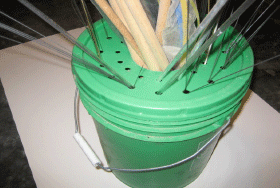
5. Large cardboard tube for an assortment of wooden dowels – this keeps my wife out of the good stuff in the plastic bucket.
– Buzz Wilson
- Converting Combat shutoffs: Some centripetal shutoffs can be easily converted to line tension leadout-operated type. The McFadden and similar swing arm style need the weight removed, any spring removed, and the wand arm extended to about 7 inches from the fuel line pinch point to the loop in the wire end, where the fishing line to the leadouts fits through. .062" music wire is preferred for the extension. Wrap the extension joint in copper wire and solder it. If you don't solder, then wrap it in strong thread and epoxy coat it.
Now check that the fuel line can be crushed when the wire wand is pulled across toward the right wing tip. Adjust the shutoff so that the pinch operates with the wand approximately parallel to the center line of the plane.
Now you need the pinch spring. If you are a freeflighter you will like this idea. Skinny rubber bands. Number 7 or 8 or even up to number 12 works fine. Swing the arm into the pinched position and push a small finishing nail into the spar about 1 1/2 inches outboard of the arm. Angle it outward at about 45 degrees. Now take a skinny rubber band and slip it over the nail, around the wand arm(2 wraps) about 1 1/4 inches back from the pinch and back over the nail head. Check that there is enough tension to pinch off the fuel line but that pulling about 2 to 3lb on the arm tip toward the left wing tip opens up the shutoff. Experiment with more or less rubber band and the distance from the pinch until it operates properly. Now attach your 15lb fishing line to one leadout loop, through the wand arm end and back out to the other leadout. Adjust so that the shutoff is fully open for straight leadouts at the wingtip. A launch position arm holder can me made using another small finishing nail pushed into the spar on the inboard side.
Check the condition of the rubber band spring every 2 flights and replace if it looks tired.
– Mel Lyne
- Does your diesel Combat engine seem to run a bit slow?
Diesels tend to get carbon on top of the piston causing pre-ignition, especially when they get hot. You can hear this as a "crackle" in the exhaust sound.They also get lacquering on the piston walls from slower running. To bring your motor back on form try these steps.
1. Take a #11 X-Acto knife and go in through the exhaust ports and carefully scrape away the carbon deposits. They are soft and come off easily. This will stop the pre-ignition. Try and avoid taking the cylinder/piston apart.
2. To de-lacquer the piston walls it needs to run fast and get hot. So warm your .15 motor up on a 8 x 6 then put on a 7 x 4. Start it up and increase compression until it howls. Run it for 2 minutes flat out nice and lean. This blows any carbon deposits off the contrapiston also.
Your motor should now run a bit faster on an 8 x 6.
– Mel Lyne
- Engine alignment: Any positive or negative engine alignment on a profile fuselage plane is a bad thing. Here's a method to keep things straight and level. Before drilling the holes for engine mounting, place a piece of good straight music wire into the engine head fins. A good size to use would be 3/32 inch diameter, and long enough to reach where the wing trailing edge will be. Now with the engine sitting in the mounting area and the wire used as a sighting device, the wing cutout section can be used as a reference by making sure the wire is centered and/or parallel with the wing cutout. Tweak the engine up or down as might be needed, and then carefully mark for drilling the mounting bolt holes.
– Mike Hazel
- Tip weight boxes made easy:
 The most common kind of tip weight container in stunt planes is the simple box with a blind nut in the bottom, the top being a lid held on by a long 4-40 bolt. This is the type included in Brodak kits, for example. These are great for trimming an airplane by adjusting the tip weight. One drawback, however, is that it can be very difficult to get the bolt started in the blind nut when there's weight in the box, because you have to blindly find the nut from a long distance away. Here's a way to make it easy. Before installing the blind nut, enlarge the hole the the blind nut will go into enough to allow a piece of 3/16" brass tubing to press fit into it. Cut a piece of tubing that goes about 2/3 the distance up the tip weight box, and press fit it into the blind nut's hole. Secure it with a drop of CYA glue. Then install the blind nut. Now you have a guide for the long bolt that holds the lid on. No more trouble starting the bolt in the threads! (The tip weight box is installed at the end of the outboard wing, upside-down, so that the lid is at the bottom.) The pictures show (left to right), tip weight box with lid on (bottom side of wing); tip weight box open, guide tube visible; tip weight box bottom (seen from top side of wing).
– John Thompson
- Color scheming: Trying to figure out the color scheme on your latest masterpiece airplane? Use your computer's drawing program to try different ideas. Use the tool palette to draw a schematic airplane (it doesn't have to match the planform perfectly). Then use the fill tools to color various parts. You can quickly change the colors to try different combinations. When you've got it the way you like it, print out the page and take it into the workshop to use as a guide.
– John Thompson
- Fuel system cleaning kit: I use and very highly recommend the Sullivan "Fuel System Cleaning Kit." It's a small squirt bottle for holding various squirtables, and two teeny little bottle brushes that will go through the spraybar and remove anything. This is better than just a plain-old squirt, since it usually will take out "hair" or other fibrous material that sometime sticks in there, even if fuel will still run through there. The smaller of the two will even go safely through the tiny fuel inlet on the PA spraybar with no problems.
– Brett Buck via Stuka Stunt Works
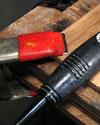
- Instant Band-Aid: The other day I was practice flying and managed to put my finger into the prop. If you have ever tried to put a Band-Aid on a cut that has oil mixed with blood you know that it is impossible to get a band-aid to stick. I did not have a Band-Aid but did have a latex glove in my toolbox. Instant Band-Aid!
– Buzz Wilson
- Creative tools: Sometimes a propeller will get chipped or fuzzed. Don't throw it away! When it comes to shaping fillets or some other pliable material, a prop can make a great tool. A few seconds on the belt sander can modify the shape of the tip for your purpose. Use it once and then throw it away.
– John Thompson
- Creative tools II: A set of old dental tools can be picked up at garage sales, swap meets, etc. They have dozens of uses in the workshop!
– John Thompson
- Heat Shrink Tubing: A good source for heat shrink tubing is your local auto parts supply store. They will have it out front in packages, and larger sizes behind the counter. Buy some red and black. When building new planes, use the black on the up leadout and the red on the down leadout. Do the same on your control lines. Match the colors and you eliminate hooking up the lines backwards.
– Buzz Wilson
- Beware wild animals: Don't store your balsa in an open box on the floor. My cat decided to use my best balsa stash to sharpen his claws. And this was premium wood from Riley Wooten. I might add that I have moved my balsa pile to a place our cat can't reach.
– Floyd Carter
- Hold 'em: To hold wings or structures down on the bench while I'm covering them I've generally used phone boks or the like. But there's something way better. Keyboard wrist rests. I have a couple of these sausage-like rests and they are filled with a very dense jellylike material. They drape nicely over a wing to hold one half down while I cover the other half.
– Mel Lyne
- A FasCal tip: Covering a wing half, I cut the FasCal to size. Then I tape the FasCal in place at the wing root. Now I peel the FasCal up from the backing at the wingtip and fold it back. I cut half the backing away and lay down the sticky FasCal onto the wing going out to the wingtip. Now I lift the FasCal and backing at the wing root, fold it towards the tip and push the remaining backing off so the FasCal lies down on to the wing going in toward the wing root. This method keeps perfect alignment.
– Mel Lyne
Flying Lines home page
This page was upated Jan. 10, 2022